
 In this series, I’m discussing the phases of a project encompassing a non-trivial set of Ethereum smart contracts and the React/Redux application that communicates with them.
The project, called In-App Pro Shop, aims to help Ethereum developers easily support in-app purchases as ERC-721 Non-fungible Tokens (NFTs).
- Part 1 – Decisions
- Part 2 – Functionality
- Part 3 – Setup and Test
- Part 4 – Writing Contracts
- Part 5 – Writing Tests
- Part 6 – Bootstrapping the Client
- Part 7 – Client to Contract Communications
- Part 8 – Deployment
NOTE: While this series is now slightly out of date, the project itself and the published book are updated.
Starting Up
As discussed in Part 1, the client for this project is written in JavaScript with an architecture of React and Redux. It’s a bit beyond the scope of this series to bring you up to speed on that ecosystem, so I’m going to take it as a given that you understand or are at least passingly familiar with it.
What I’ll be doing here is showing you the unique aspects of a client that talks to the blockchain on behalf of a user that has authenticated with a blockchain-aware browser or MetaMask. For the purposes of the article, I’ll assume you’re running MetaMask, and have configured it as described in Part 3.
First Things First
Given that we have Ganache running, with our contracts deployed and mock data created, there are two things that need to do before anything useful can happen in this client:
- Authenticate the user in some fashion so that we can make blockchain transactions on their behalf
- Connect to the blockchain so that we can send transactions or invoke methods that request data
How do we achieve those tasks?
Web3 – The Low-level Ethereum API
From your application’s perspective, both of these things will be handled by a library called web3.js.
Your app’s awareness of the user will be strictly reduced to list of the accounts that are made available to you by Web3. All interactions with the blockchain will happen via Web3. You can instantiate Web3 yourself, or you can snag MetaMask’s instance. If MetaMask isn’t running in your browser, then your instance can still connect to Ganache and get the accounts it created at startup.
Now, if you followed the Web3 link above and had a look at the API, it might seem a little daunting. It’s definitely a low-level API that requires you to know a lot about the nitty gritty details of Ethereum. When I began the In-App Pro Shop client, I started with Web3 and nothing else. I was able to make progress, but I quickly realized there were a lot of places I could drop the ball.
Fortunately, our friends over at Consensys realized this and provided us with a much friendlier tool called Drizzle. If you’re using React as we are, Drizzle, is just about the quickest way to get to the joy.
Drizzle – The High-level Abstraction You Need
Drizzle is based on a Redux store, which you’re free to use for managing the entire state of your app. I preferred to keep state in my own store while allowing Drizzle to maintain its own state. You can treat Drizzle as a black box that provides you with:
- The accounts you are authorized to use
- A local cache of relevant blockchain data for speed
- Events from the blockchain (although the implementation is less than complete at the moment)
- Representations of your contracts via Truffle’s contract abstraction, which we’ve talked about previously and used in our contract unit tests
At startup, we need to create Drizzle’s store, configured with everything it needs to know, including references to our compiled contracts. Drizzle uses React’s Context API to provide us with a handle to everything we need to interact with it. IMHO, this wasn’t the best choice, but it works. It just led to an unavoidably obtuse bit of bootstrapping code which we’ll see and unravel in a moment.
We also want to create our own Redux store in the usual way. Finally, we need to create our main App component. I haven’t added routing to this application, primarily because to support bookmarking of a route would be overly complicated given the possibility of multiple Shop Owner accounts with multiple Shops.
Bootstrapping with index.js
Bearing all this in mind, let’s have a quick look at the index.js file for our React app.
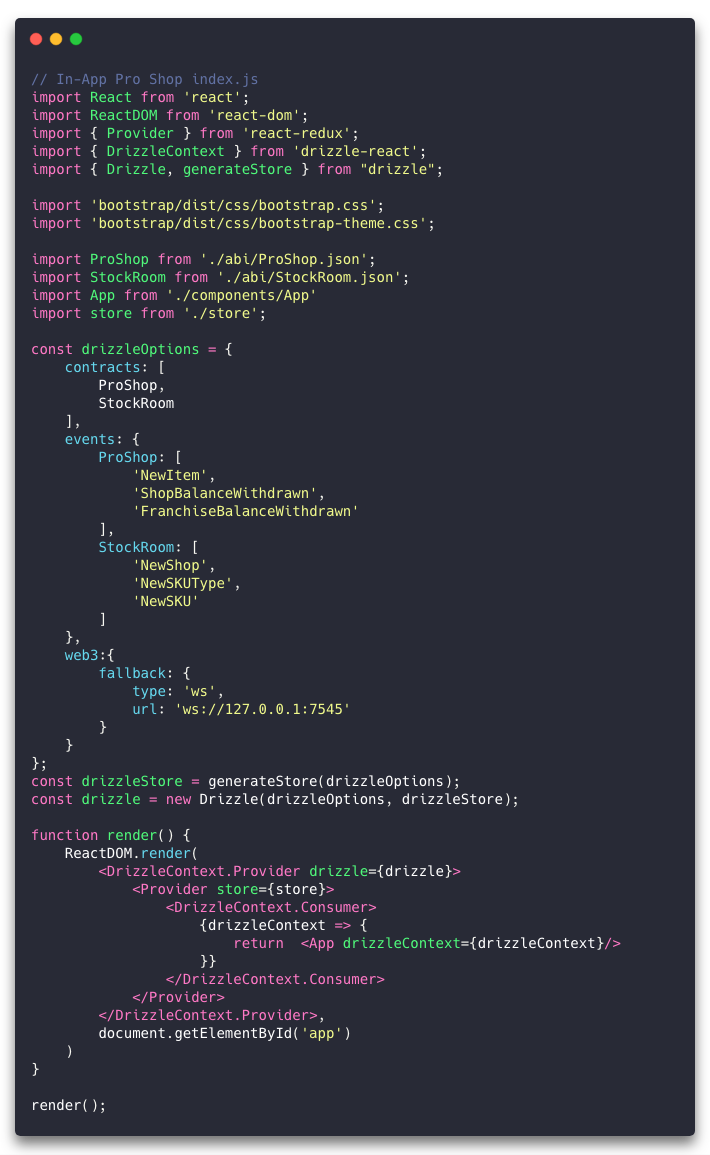
Imports
In the imports section, the one notable thing to touch on is the “ProShop” and “StockRoom” imports that come from the “/abi” folder. You may recall from Part 1 that we’re using the create-react-app scripts and one of the prohibitions we’re laboring under is that all imported files need to come from the “/src” folder. From React’s standpoint, “/abi” is actually “/src/abi”. Also, we had to configure Truffle to output its compiled contracts to this folder so that we could import them. That was done in truffle.js.
That leads us to the “drizzleOptions” declaration.
Drizzle Options
First, we pass the “ProShop” and “StockRoom” imports to Drizzle in the “contracts” section. Simple enough. Drizzle will use these compiled contracts to give us our contract abstraction that we can call methods on later.
The “events” section enumerates each contract and its events which we presumably want to listen for and be notified about. As I mentioned above, this part of Drizzle is not fully implemented at the moment, so they’re just here for form. Later we’ll get into how we handle the events using the underlying Web3 library when needed.
Finally, there is a “web3” section where a fallback is defined as a websocket to a port on our localhost. This is used if Drizzle doesn’t find a Web3 instance initialized by MetaMask. That allows us to talk to our local Ganache instance directly if MetaMask isn’t installed.
Instantiating Drizzle and Its Store
Drizzle has its own store, which we first create with “generateStore”, passing it the “drizzleOptions” we defined above. Then we instantiate Drizzle itself, passing in the “drizzleOptions” and the “drizzleStore” we just created. I think that could have been done with a single call to a static factory method on Drizzle, but I’m sure the architects at Consensys had their reasons for doing it this way.
The Render Function
I said that the Context API was maybe not the greatest choice for how to build this thing. That’s mainly because only the App component uses it and React’s Context API is really meant as a way of letting descendent components magically access a context created above it somewhere without having to explicitly pass that context through intermediate components that don’t need it as props.
But here, only the App component needs access to the DrizzleContext, and its needed in “componentDidUpdate” so we actually have to create the context then get the context from the consumer and pass it into the App component as a prop anyway.
Creating the context is done with the outer “DrizzleContext.Provider” wrapper, which we pass the “drizzle” instance to. Then we instantiate the “Provider” for our own Redux store in the usual way. Inside that wrapper, we have a “DrizzleContext.Consumer” which takes the “drizzleContext” it gets from the “DrizzleContext.Provider” above it and returns an instance of our “App” component with “drizzleContext” as a prop.
Could this be simpler? Absolutely, I believe it could. But at least it’s contained to this one bootstrap file, and now our App component can access the DrizzleContext and all its goodness inside “componentDidUpdate” which it will need to do in order to further orchestrate the startup process.
Regardless of startup elegance or lack thereof, let’s move on and see how App.js takes this handoff and runs with it.
State Management Handled by the App Component
In App.js, the component will orchestrate the rest of the startup process by watching Drizzle’s state and our own store’s state in its “componentDidUpdate” method and taking appropriate actions on certain changes.
In the partial extract below, you can see that method and the state and action dispatchers we’ve mapped to props for the component using “mapStateToProps” and “mapDispatchToProps”.

From the “drizzleContext” object, we get “drizzle”, “drizzleState”, and “initialized”. The initialized variable tells us when Drizzle has managed to connect to Web3 and has our contracts and accounts ready to work with.
We’re going to take our actions in “componentDidUpdate” only when something changes, and we know that by comparing the current values to the previous props. This is important so that we don’t get into a loop of continuously performing an action.
This method handles not only the startup of the app, but also a few state changes that are necessary when the user changes the selected account or Shop.
Things That Happen Automatically at Startup
- Store the accounts when Drizzle initializes
- Select the first account when the accounts are fetched
- Get Shops when an account is selected
If you are connecting to Ganache, you might get ten accounts when Drizzle initializes. If you’re connecting to MetaMask, you’ll only get its selected account. The former case is most likely true only during development and testing. If almost all of the time we’re only going to get a single account to work with, then we don’t want the user to have to manually open the Accounts menu and select their sole account. So, we’ll automatically select it.
Further, when whenever an account is selected (automatically at startup or later by the user), we’ll want to fetch all the Shops for that account and populate the Shops menu. If you need a refresher on what the interface looks like, pop back to Part 2.
Storing Accounts
When Drizzle first initializes, if there are any accounts in “drizzleState.accounts”, we pass them to the action dispatcher “accountsFetched”, which will in turn trigger a reducer to persist them in our store. That will in turn cause our mapped “accounts” prop to change by way of “mapStateToProps”.
Auto-selecting the First Account
When our “accounts” prop changes, and has a non-zero length, we pass its first element to the “selectAccount” action dispatcher. This will lead to our “selectedAccount” prop changing via “mapStateToProps”.
Fetching the Selected Account’s Shops
When our “selectedAccount” prop changes and is non-null, we call the “getShops” action dispatcher, passing the “StockRoom” contract (plucked by name using a constant from “drizzle.contracts”) and the “selectedAccount”.
Things That Can Happen On User Interaction
- Get Shops when an account is selected
- Get SKUs & SKUTypes when Shop is selected
An Account is Selected
The user will only be able to select a different account if they have connected to their local Ganache node via the Drizzle fallback configuration when MetaMask and Web3 are not present. Still, it can happen and falls into this category as well as the startup conditions.
A Shop is Selected
We don’t automatically select a Shop if there is one, because that we don’t want to fetch too much data in case the user has multiple Shops or intends to create a new one in this session. We wait for them to make a selection or create one. When the “selectedShop” changes and is non-null, we do the following:
- Get the Shop’s balance by passing the “ProShop” contract, “selectedAccount”, and “selectedShopId” to the “checkShopBalance” action dispatcher
- Get the SKUTypes (categories) by passing the “StockRoom” contract and the “selectedShopId” to the “getSKUTypes” action dispatcher
- Get the SKUs (item descriptions) by passing the “StockRoom” contract and the “selectedShopId” to the “getSKUs” action dispatcher
Rendering the UI in the App Component
We’ve seen how the App component gets its relevant state and action dispatchers, how it automatically fetches accounts when Drizzle is initialized, automatically selects the first account, fetches the Shops when the selected account changes, and checks the Shop balance and fetches SKUs and SKUTypes when the selected Shop changes. Now, let’s see how we render the UI in the following excerpt.
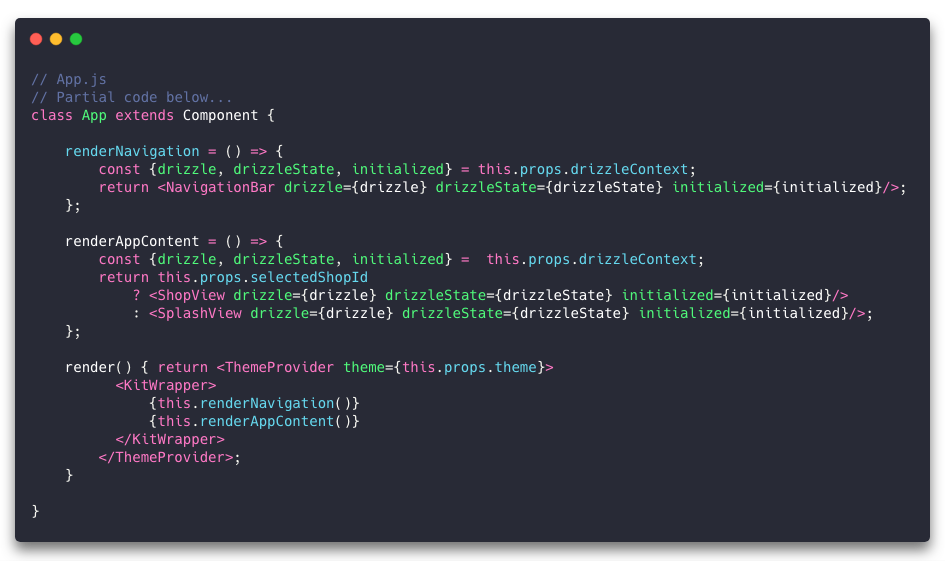
The render Method
The “render” method is sleek, and only needs to return the “NavigationBar” component and whatever is appropriate for the content section below it. It wraps these two items with the Styled Components “ThemeProvider” and our custom “KitWrapper“, which is basically a styled HTML section element. It gets both the elements it needs to wrap from two helper functions.
The renderNavigation function
Basically, all this function does is return our custom “NavigationBar” component, passing “drizzle”, “drizzleState”, and “initialized” from the DrizzleContext as props.
The renderAppContent function
This function returns either a “ShopView” component or a “SplashView” component, based on whether there is a “selectedShopId”. The returned component also has “drizzle”, “drizzleState”, and “initialized” as props passed from the DrizzleContext.
The “SplashView” component renders the page that welcomes the user and offers a “Create Shop” form. The “ShopView” component displays and allows editing of an existing or newly created Shop.
(Not the) Conclusion
In this part, we’ve seen how we use Drizzle to mediate between our React client and the Ethereum API (Web3).
If MetaMask is available we get the selected account from the authenticated user, otherwise, we can fallback to a websocket connection to our local Ganache instance, where we would receive multiple accounts. Accordingly, we auto-select the first account we receive and then fetch any Shops that account may have associated with it so the user can choose one to edit or create a new one if they want.
We saw how the app manages all this and renders an appropriate screen to the user depending upon whether there is a selected Shop.
Coming up, in Part 7, we’ll go deeper into the UI and how we interact with the contracts as the user engages with the application.