
 In this series, I’m discussing the phases of a project encompassing a non-trivial set of Ethereum smart contracts and the React/Redux application that communicates with them.
The project, called In-App Pro Shop, aims to help Ethereum developers easily support in-app purchases as ERC-721 Non-fungible Tokens (NFTs).
- Part 1 – Decisions
- Part 2 – Functionality
- Part 3 – Setup and Test
- Part 4 – Writing Contracts
- Part 5 – Writing Tests
- Part 6 – Bootstrapping the Client
- Part 7 – Client to Contract Communications
- Part 8 – Deployment
NOTE: While this series is now slightly out of date, the project itself and the published book are updated.
Moving On
In Part 6 we saw how to bootstrap a React application using Drizzle, and get to a state where we have the user’s Ethereum account(s) and representations of our deployed contracts available. We even saw how we can react to that state by auto-selecting the first account and firing off a Redux action to fetch that account’s existing Shops.
In this installment, we’ll examine how actions – like the one to fetch Shops – result in retrieval of data from the blockchain. And we’ll see the more complicated scenario of writing data to the blockchain, which requires a transaction to be sent, an event to be dispatched, and our application to hear and respond to the event.
ShopActions
Let’s start with the action that fetches the Shops. Previously, we saw that the action dispatcher “getShops” is called from within “componentDidUpdate” of the App.js component. We skipped over what happens when that action is dispatched and focused on how the component reacts to the data when it comes in.
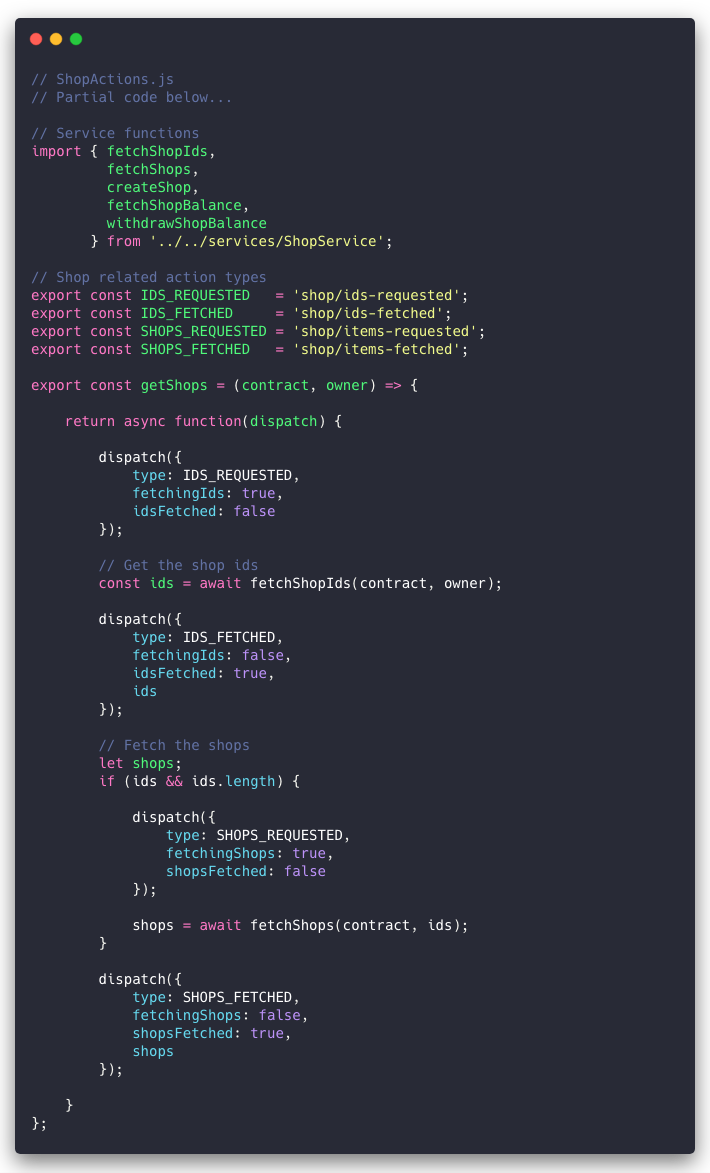
In the abbreviated extract of ShopActions.js shown here, we first import the functions which perform Shop-related interactions with our deployed contracts. Then we define the action type constants that we’re concerned with at the moment.
The “getShops” Thunk
Next we have the “getShops” action dispatcher. It takes “contract” and “owner” arguments, and is written as a thunk. Most action dispatcher functions simply return an object with a “type” and optionally a few properties. The store’s “dispatch” method then passes that to the reducer where state is altered synchronously. But when we use the redux-thunk library, we can return a function which takes “dispatch” as an argument and should return a promise. This allows us to perform asynchronous actions like requesting data from the blockchain as well as dispatching actions.
In “getShops” we first dispatch an “IDS_REQUESTED” action, which will be processed by a reducer and update state with flags indicating that we’re fetching the Shop IDs and that they haven’t been fetched yet.
Then we set a constant “ids” with a call to the imported service function “fetchShopIds” using “await” to halt the thread of execution until the value is returned. We pass that function the “contract” and “owner” that we received from the UI. You may recall that the App component has access to Drizzle and its contract instances. It also has all the accounts. So it has passed in the StockRoom contract and the selected account. From this thunk, we are passing them on to the service function which will make the actual request. While this could’ve been done in the component itself or in this thunk, this isolation of the contract method invocation into a service function makes for easier unit testing.
Once the Shop IDs have been returned, we dispatch an “IDS_REQUESTED” action, with the data and the flag indicating the IDs have been fetched.
This was only the first step, though. If any IDs were returned, we now need to fetch each of the Shop Owner’s Shops by ID. In that case, we dispatch a “SHOPS_REQUESTED” action, again allowing a reducer to update the application state with a hint as to what we’re up to. When we get the Shops back, we dispatch a “SHOPS_FETCHED” action with the data.
Using this pattern in a thunk allows the UI to react by, for instance, showing a spinner while an async action takes place, then removing it and displaying the data when it is fetched.
ShopReducer
For completeness, we’ll take quick peek at the reducer, which will respond to these actions by updating the application state. There’s not much to discuss if you know Redux, which is an assumption in this post.
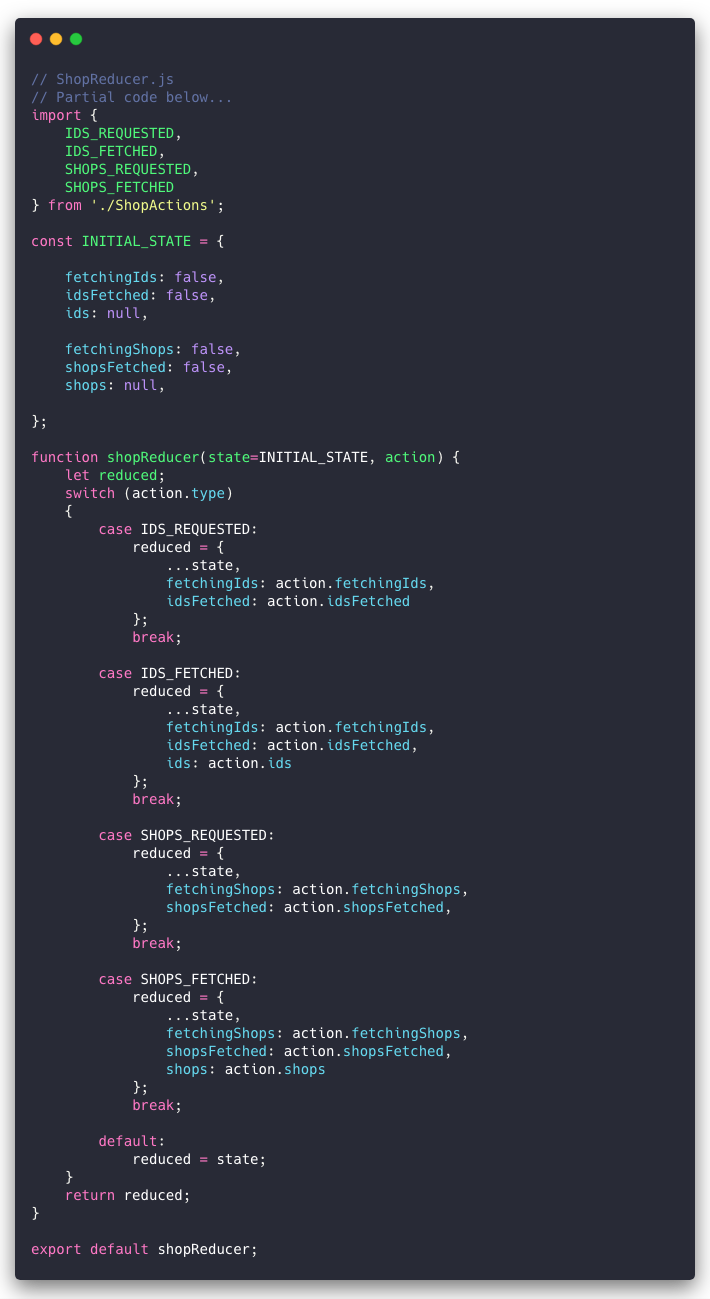
Of course once the reducer has returned the updated state, the components that map that state to props will render again, in this case, updating the Shops menu with the Shops that were returned, if any.
Now for the spot where the rubber hits the road…
ShopService
This little ES6 module is were we actually invoke the Shop-related contract methods, getting data back from the blockchain. Here’s an extract from ShopService.js that shows how we get the Shop IDs and Shops:
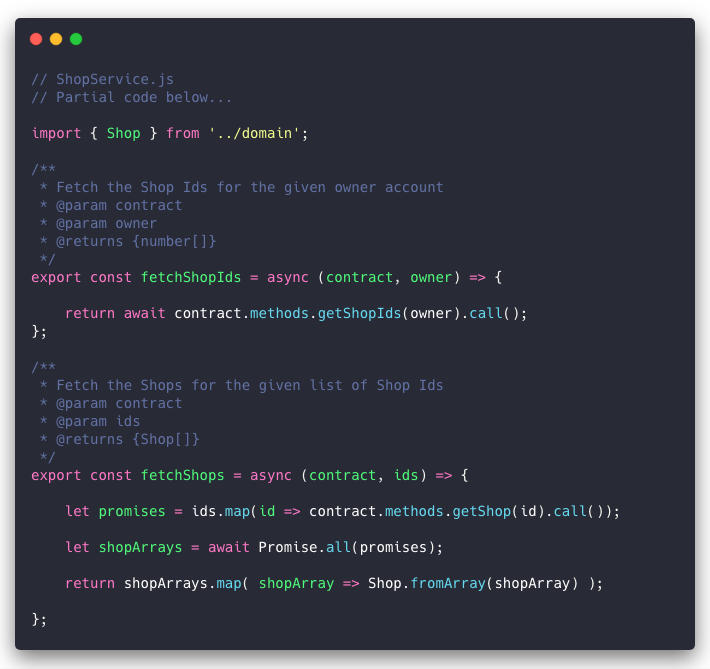
First, we import something called “Shop” from the “domain” folder. Shop.js defines a class that represents the Shop domain entity. It is a JavaScript mirror of our Solidity struct that has methods for validating the entire object and its individual fields, as well as factory methods for creating a new Shop instance from an ordinary JavaScript object or from an array of values, which you may remember from Part 5, is how a Shop is returned in pieces from the “getShop” contract method.
As we saw in the “getShops” thunk, getting the user’s Shops is a two step process. We get the IDs of all the Shops in one call, then we make another call that fetches each corresponding Shop.
The “fetchShopIds” Function
Here, in our “fetchShopIds” function (so named to avoid confusion with the action dispatcher “getShops” that calls it), we make an async call to “contract.methods.getShopIds”, passing the owner address, and invoking “call” on the returned function.
You may have noticed that this is a little different from the syntax we used in our contract unit tests in Part 5, which arose from Truffle framework’s contract abstraction. The “contract” object that Drizzle has provided us is a Web3 contract instance, and operations on its methods collection are documented here.
Still, this is pretty straightforward stuff. We’re just going to return the array of Shop IDs (which may be empty) that we get back from this call. The thunk will then examine the results and call our “fetchShops” function if any IDs were returned.
The “fetchShops” Function
In the “fetchShops” function, we map the array of IDs to an array of promises, each of which is returned from an invocation of “call” on “contract.methods.getShop” where we pass in the ID at the array index being mapped.
Then we await the resolution of all the promises, which will be deposited into a constant “shopArrays”. Recall that the contract’s “getShop” method returns an array containing the properties of the indicated Shop struct.
We now have an array of arrays representing all the user’s Shops. We need to turn that into an array of Shop instances. That’s easily done by mapping the “shopArrays” array and invoking “Shop.fromArray” on each element. The result is returned immediately, where the thunk will pass it to the reducer in a “SHOPS_FETCHED” action, the application state will be updated, triggering update of the UI, specifically the Shops menu on the “NavigationBar” component.
Writing Data to The Blockchain
We’ve just seen how to fetch the user’s existing Shops. Now let’s see how we can actually create one.
Fetching data from a contract is basically the same as any async query you might make to an ordinary database-backed API. That’s because it doesn’t entail creation of blockchain transactions or events.
The process of writing data will be a tad more complicated.
When you invoke a method that writes data, you actually send a transaction rather than make a call, and you receive a promise that resolves to the 32-bit transaction hash, not the return value of the function.
That transaction hash is a handle to the finished transaction that was written on the blockchain, which contains the loads of details, including the block number, gas used, etc.
But that’s generally not what you want in the client after firing off this transaction. In this particular case, what we want is the Shop ID that was assigned to our new Shop.
How do we get the data we’re actually after? We listen for the event that was emitted from the function we sent the transaction to. To understand how this works, let’s return to our “ShopService” module and its “createShop” function.

The “createShop” Function
As you might expect, the function takes all the properties of a new Shop. They were collected from the Create Shop form and passed to a another thunk called “fetchShops” in ShopActions.js.
But there’s one more argument to the “createShop” function — “callback”. And notice that this function (“createShop”) doesn’t return anything. Consequently, you might expect the “fetchShops” thunk in ShopActions.js will have a different implementation from the “getShops” one we saw before. We’ll follow up on that in a moment.
The first thing this function does is set a one-time listener for the “NewShop” event that’s emitted from the “createShop” method on the deployed “StockRoom” contract. It does that by using our “EVENTS.NEW_SHOP” constant to select the appropriate event handle in the Web3 “contract” instance. It filters the events coming from that contract to those where the “owner” property is equal to our “owner” address. Finally, it invokes “once” on the returned object specifying that the very next event of this type should be passed to the “callback” function, and then the listener should be removed.
With the event listener set up, it proceeds to send the transaction by passing the rest of the arguments to “contract.methods.createShop”, and invoking “send” instead of “call” on the returned object. In our “send” invocation, we pass a config argument with the “from” property set to our “owner” address.
When the Shop is created in the deployed contract and the transaction written to the blockchain, an event will be emitted. We’ll receive that event in the “callback” function that was passed in as the last argument to this “createShop” service function.
Now, let’s pop back over to ShopActions.js and have a look at the thunk that invoked “createShop”. 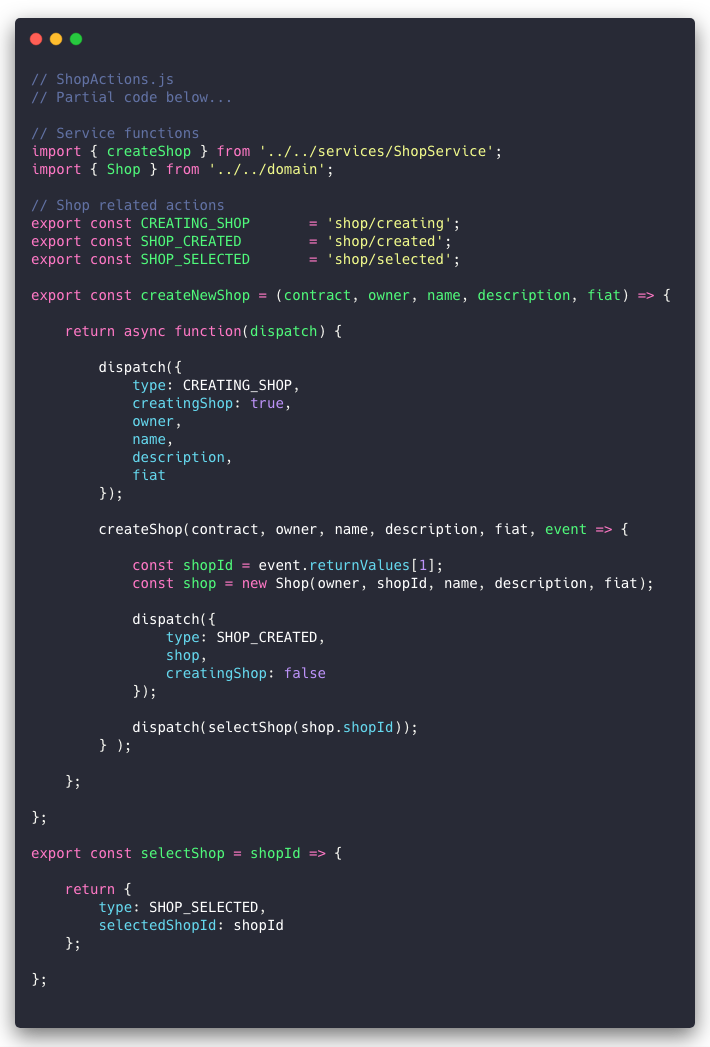
The “createNewShop” Thunk
This thunk doesn’t look that much different than the one we used to fetch the Shop IDs and Shops before.
Similarly, it’s invoked from a component in the UI and is passed the all the arguments we’ll need to get the job done, including the contract instance and selected account (from Drizzle) as well as the fields required to create a new Shop.
Also, following the previous thunk’s pattern, we immediately dispatch a “CREATING_SHOP” action, so that the UI can react by hiding the form’s submit button and replacing it with an spinner.
Then it calls the imported “createShop” service function. And this is where it deviates from the previous thunk’s implementation.
Rather than awaiting a return value and then dispatching another action, it instead passes an anonymous function as the last argument of the call. That anonymous function takes an argument called “event”.
Remember how the “createShop” service function’s event listener invokes the “callback” function that we pass it? Well, this is that callback. This is where we take the data in that event and add it to our application state.
What will the event look like?
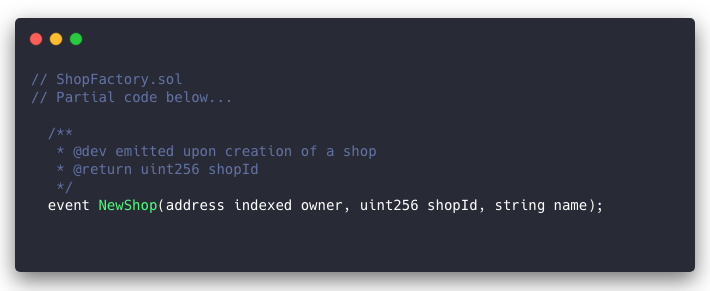
In our ShopFactory.sol contract, we declare the new “NewShop” event that gets emitted when “createShop” has added the new Shop to the contract’s state. Since the first argument — “owner” — is indexed, we were able to filter this event by owner in our “createShop” service function. The second argument is “shopId”, and that’s what we’re interested in now.
In our anonymous callback function, we get the “shopId” from the “event.returnValues” array at index 1. Then we create a new “Shop” entity from the data we already have plus the “shopId”, and dispatch a “SHOP_CREATED” action. That action passes the new Shop to the reducer where it will be added to the owner’s Shops in our store.
Finally, we’ll dispatch one more action; “SHOP_SELECTED”, using the simple action dispatcher “shopSelected”. This is the same action dispatcher that would be used if the user clicked on a Shop in the Shops menu.
ShopReducer Revisited
It’s worth having a quick look at how the reducer deals with the “CREATING_SHOP”, “SHOP_CREATED”, and “SHOP_SELECTED” actions. In this extract from ShopReducer.js, those cases and the relevant bits of state are shown.
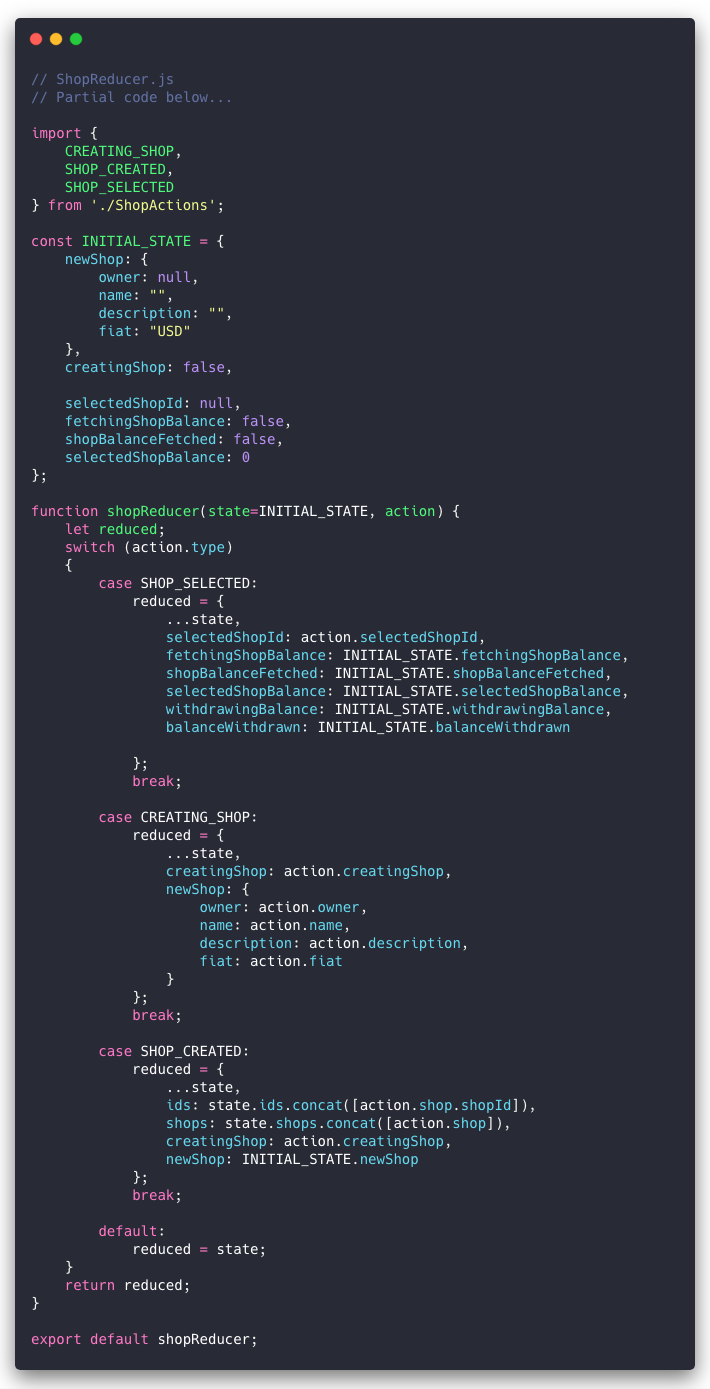
Note that the “SHOP_SELECTED” case basically just sets the selected Shop’s ID and resets all the other state elements related to the selected shop to their values as represented in “INITIAL_STATE”.
In the case of “CREATING_SHOP”, we place all the form values that were sent to the action dispatcher into the “newShop” section of Shop-related state and set the “creatingShop” flag.
Finally, to handle “SHOP_CREATED”, we replace the array of Shop IDs with a copy that has the new Shop’s ID added to the end. Likewise, we replace the array of Shops with a copy that has the new Shop entity added. We clear the “creatingShop” flag and reset the “newShop” object to its representation in “INITIAL_STATE”.
Create New Shop UI
 Since we’re assuming you understand React and Redux, a full description of the UI components used to display the form and call the action dispatcher on submission is academic. I only touch on it here for a sense of closure for this use case.
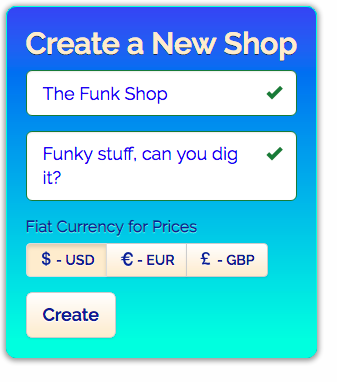
There are validated fields for Shop Name and Description, a radio button selector for fiat currency, and a submit button labeled “Create” that gets replaced by a spinner while “creatingShop” is true in the application state. The fields are managed by the “newShop” section of state that we saw in ShopReducer.js.
The mechanics of the form are uninteresting, and to include the source code here would raise more questions than it answers because of the use of the Styled Components and Bootstrap libraries as well as the custom component kit created for this app.
If you’re interested, have a look at SplashView.js which instantiates ShopForm.js shown here. To explore how the components are themed, root around in the src/components/theme folder, and the custom component kit in src/components/theme/kit.
(Not the) Conclusion
In this installment, we’ve seen how to call and send transactions to methods on the Web3 contract instances we get from Drizzle.
Calling a contract method that merely returns data can be done with async/await or ordinary promise handling. However when sending a transaction that will write data to the contract we will need to listen for the event emitted by the method we sent the transaction to.
When listening for events, we can filter by any indexed properties of the event, such as the owner of the Shop, so that we don’t inadvertently respond to events generated by other users.
We saw how all this fits within the framework of a React application using Redux to maintain state.
Coming up in Part 8, the final installment of this series, we’ll see how to deploy our contract to a public testnet.