
 In this series, I’m discussing the phases of a project encompassing a non-trivial set of Ethereum smart contracts and the React/Redux application that communicates with them.
The project, called In-App Pro Shop, aims to help Ethereum developers easily support in-app purchases as ERC-721 Non-fungible Tokens (NFTs).
- Part 1 – Decisions
- Part 2 – Functionality
- Part 3 – Setup and Test
- Part 4 – Writing Contracts
- Part 5 – Writing Tests
- Part 6 – Bootstrapping the Client
- Part 7 – Client to Contract Communications
- Part 8 – Deployment
NOTE: While this series is now slightly out of date, the project itself and the published book are updated.
The Goal
I wanted to create a system wherein developers of Ethereum-based apps or games with in-app purchases could mint the items they sell as ERC-721 tokens (like CryptoKitties). It would handle most of the heavy lifting so that those developers could get on with the business of writing a kick-ass product.
At the outset, I only knew that this would likely entail one or more smart contracts, and a UI that allowed anyone to create a Shop and populate it with things to sell.
Six months later, I had implemented just that. What follows is how I got there, and some of the hurdles I ran into along the way.
Decisions, Decisions
Starting a new project, particularly one that doesn’t quite match your previous experiences, is always exciting, but a can be a bit daunting. A few questions that took me a while to answer were:
- What language(s) should I use?
- What blockchain tech stack do I need to get started?
- What framework(s) will I build the UI with?
- What should the project structure look like?
In the scope of of this article, I’ll break these questions down and arrive at a place where we can move forward and start solving actual problems.
1. Language Decisions
If you’re going to write smart contracts for Ethereum, you need a language that compiles down to something executable by the Ethereum Virtual Machine (EVM).
Currently, your options are:
- Solidity
- Bamboo
- Vyper
- Mutan, a Golang-like language. It was deprecated in march 2015.
- LLL, a Lisp-like language. Still supported in core but hardly used.
- Serpent, a Python-like language Read the docs. However, it is no longer recommended to use.
At the time I began my project, Solidity was the most, well… solid solution. The other options were either on their way out, not in existence yet, or not as well documented and supported by the community.
As for the UI, we’re going to go ahead and take browser-executed JavaScript as a given. It may seem arbitrary, but that describes almost everything in life, doesn’t it?
2. Blockchain Tech Stack Decisions
This one’s a bit more nuanced.
I’d already made the decision to work with Ethereum, because its smart contracts and NFTs like CryptoKitties were what had motivated me to build this thing in the first place. That choice was axiomatic.
We need to authenticate our users and authorize them to take certain actions within the application. Further, we need to commit transactions to the blockchain on their behalf and respond to events coming from the blockchain. And of course we need to present the user an interface allowing them to instigate all this activity.
2a. How will I authenticate and authorize users?
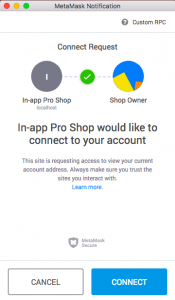
Connecting to MetaMask
I was used to implementing a password-based authentication scheme, perhaps optionally offering OAuth so that users could instead choose a trusted auth provider such as Facebook or Twitter.
But in this scenario, the only thing that matters is that the user be the verified owner of a blockchain address which can send and receive ETH, the currency of the Ethereum blockchain. They won’t be interacting with other users, just setting up shops and transferring out the balances from sales. As such, user profiles and traditional authentication processes are completely unnecessary.
But how do we verify that the user owns a given address? Fortunately, we don’t need to: there is the MetaMask browser plugin. Users log into it and it acts as an intermediary between our application and their Ethereum addresses. Sweet.
There is also the Mist browser/wallet, but my investigations into it at the time turned up very little love from the community. I’m certain other options have cropped up since then, but I’ve been following the MetaMask project on GitHub, and it has been well maintained. We don’t actually have to write any code to interface with MetaMask, so we don’t have to worry too much about this layer.
2b. How will I interact with the blockchain?
From the browser side of things, the lowest-level library you’ll need to familiarize yourself with is Web3. I believe you could absolutely build everything with JS and Web3. MetaMask provides an instance of Web3 that your app can use once it’s initialized, so you’re automatically able to implement transfers and other actions on behalf of the user. Mist does as well, and so will any other browser-based solution to Question 2a.
The problem is that we also need to test, deploy, and debug the contracts, not just talk to them from within our application. And of course, we want to run a local blockchain node so that we’re not having to put all this stuff out there on a public “testnet” (e.g., Ropsten or Rinkeby) as we develop.
That local node is itself a decision.
- Geth is an Ethereum node built in the Go language, useful when it’s time to connect to public testnets.
- Ganache-CLI (formerly TestRPC) is lightweight and friendly, perfect for starting out.
- Ganache is a GUI-based version of TestRPC. Cute, but not useful for day-to-day dev work.
Ganache-CLI has the benefit of a deterministic mode, which will generate the same set of test addresses each time you restart it. This will be hugely beneficial when it comes to testing, though I didn’t realize it when I started.
As for all the other stuff, there is the Truffle Framework which Ganache and Ganache-CLI are a part of. Truffle allows us to compile our Solidity contracts, deploy them, execute tests, debug transactions, and more. It’s well documented and maintained.
Another part of the Truffle Framework is Drizzle, which provides a Solidity contract abstraction that you can interact with in JS. It also handles automatically connecting to Web3 (either via MetaMask or some other browser intermediary, or if that’s not present, by creating a new Web3 instance).
2c. How will I make sure I’m implementing smart contract best practices?
Just like the linters we use with JavaScript, which tell us when we are making stylistic and syntactic booboos in our code, for Solidity, there is Solhint. You install it with npm and configure it with a simple JSON file. It’s lovely and keeps all your code nice and tidy, so that other Solidity developers will feel right at home with it.
Since Solidity smart contracts interact with and hold actual currency, it’s important that we stay abreast of the known vulnerabilities.
To guard against some of these hacks, we need to make certain, for instance, that overflows don’t happen when we do math operations. And of course, we want to make certain that we’re properly implementing the standards we work with, such as the ERC-721 NFTs that this application will mint. To help with all this, I chose to build on the OpenZepplin library.
3. UI Framework Decisions
Building the user interface raises yet another set of questions.
3a. Which application framework will I use?
The application framework we choose makes very little difference in the long run. Use whatever kit you’re feeling at the moment to get those buttons up on the screen and move the data from point A to point B. Personally, I’m into React and Redux. You could as easily use Angular, Vue, or even (gasp) jQuery.
Now, if you’re going to use React, there are TruffleBoxes to give you a shrink-wrapped answer to this decision. It’s worthwhile to look at them for an idea about what a fully formed project could look like. Personally, I found myself throwing out more stuff from the TruffleBox boilerplate than I was keeping, and so I ended up taking it all under advisement and starting from scratch.
For all you Angular folks, there’s a standalone boilerplate project for you on GitHub and a TruffleBox. And of course, there’s a TruffleBox for Vue if you’re into it.
Yes, there are a million other application frameworks and many of them probably have boilerplate projects for working with Truffle framework. I’ll let Google help you with that.
3b. Which component framework will I use?
Sure you could just style all the HTML buttons and inputs but that’s a little tedious if you don’t have a dedicated UX person on your team. If you’re like me, you’d rather get up and running with a decent, serviceable set of components without having to spend too much effort.
A couple of good options are Bootstrap and Material Design. And if you use Angular, Vue, or React, you can get implementations of both these kits that will work with your application framework. I chose React-Bootstrap this time around. Not because of any advantage over Material Design or any other options out there, it’s just simple, and this is a fairly simple app.
3c. How will I style my components?
Even though I’ve chosen Bootstrap for the component kit, I still need to come up with a theme for my app so it doesn’t just look like the standard, out-of-box controls.
In React, there are a number of ways to do this.
- Standard CSS
- LESS/SASS
- CSS in JS
I went with CSS in JS, because I have long thought that the separation of HTML and CSS was a pointless separation of concerns that’s more trouble than it’s worth. As your CSS (or SCSS) files grow, they do so in an unsatisfying way that is often full of duplication. I like the CSS in JS approach, and to keep it clean, I’m fond of the styled-components library. In a later post, I’ll show you how I created a simple theme with some styled Bootstrap components that got what I needed done and gave the app a cohesive look with very little effort. I event threw in a little animation here and there to make it shmoove.
4. Project Structure Decisions
If you start with a boilerplate project then you can just move right along, but I wanted as much control over the structure as possible. So, like a mountain goat defying logic and gravity, I decided to go my own way. But that’s not to say I that I didn’t inherit a bunch of decisions made for me by the choices I’d made earlier.
First, I considered whether to make separate projects for the client and the blockchain stuff, since there is different tech involved with each. Would it end up being an ugly mess if I tried to mash it all together? In the end, I decided to go with a monorepo, just to keep from having to launch and switch back and forth between two Webstorm instances.
When I say I inherited more than one structure decision based on previous choices, I mean:
- React (if you use react-scripts or create-react-app) imposes some specific structure – the public template folder, the absolute requirement that all source code be included in the src folder, and its production output folder is called build.
- Truffle’s default configuration looks for a contracts folder, a migrations folder, a test folder, and creates a build folder for the compiled contracts, which obviously conflicts with the React output folder.
- Also, I found my React code needed to load the compiled Solidity contracts, and since React needs any imported files to be under src, I had to configure Truffle to output builds into src/abi.
Although all the requirements weren’t present at the beginning of the project, ultimately, I ended up with top level folders for:
- Smart contract sources
- Project documentation
- Migration scripts which compile and deploy the contracts to the blockchain
- Scripts that create mock data on the blockchain for manually testing the app
- The React HTML template and assets
- React app sources
- Smart contract tests
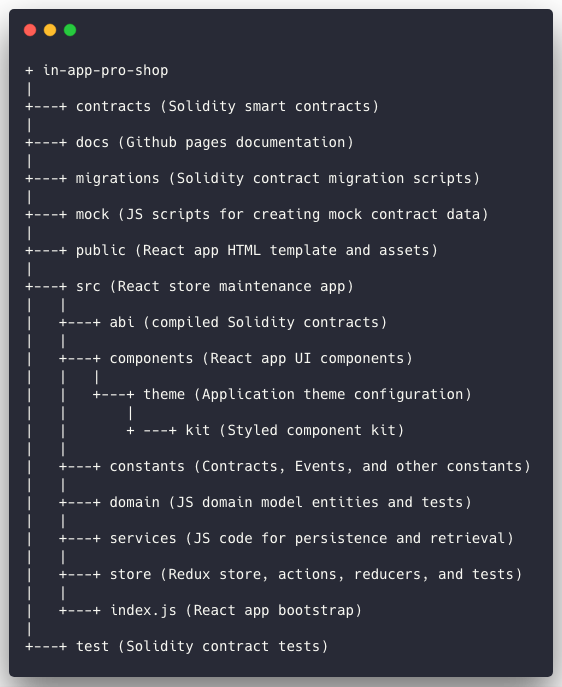
Final Project Structure
Resultant Dependencies
Based on all of the above decisions, here are the main packages that the project ended up needing.
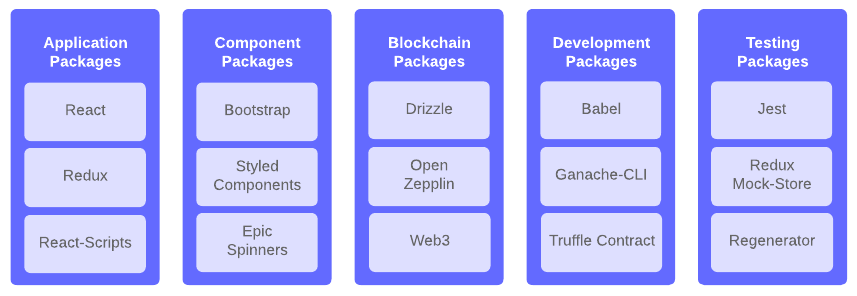
Project Dependencies
(Not the) Conclusion
This is just the beginning folks. I hope I’ve adequately covered the initial head-scratching broad-stroke questions about what decisions need to be made just to get to the starting line. It took a lot of study just to get to a point where I had an idea of what would go into a basic Ethereum blockchain project.
In Part 2, I describe the functionality that our front-end Shop maintenance application will require, so that we have an idea what the scope of the project looks like.
Until then, if you want to peruse the project or even pull it down and fiddle with it locally, just head over to https://in-app-pro-shop.futurescale.com.