 In this series, I’m discussing the phases of a project encompassing a non-trivial set of Ethereum smart contracts and the React/Redux application that communicates with them.
The project, called In-App Pro Shop, aims to help Ethereum developers easily support in-app purchases as ERC-721 Non-fungible Tokens (NFTs).
- Part 1 – Decisions
- Part 2 – Functionality
- Part 3 – Setup and Test
- Part 4 – Writing Contracts
- Part 5 – Writing Tests
- Part 6 – Bootstrapping the Client
- Part 7 – Client to Contract Communications
- Part 8 – Deployment
NOTE: While this series is now slightly out of date, the project itself and the published book are updated.
To Test or Not to Test
Regardless of the programming language we use, unit testing helps us to maintain confidence in our ongoing development efforts as we add new and refactor existing functionality. But often, owing to deadlines, dislike of “grunt work”, or just general laziness, we skip unit tests. “The proof is in the pudding,” some say. “If the new feature works and doesn’t seem to have broken any of the old ones, why waste time writing unit tests?”
Personally, I could debate either side of that age-old holy war with gusto. I like to seek a happy medium of testing the truly important bits without sweating 100% coverage just for the sake of ticking all the boxes. If a client is footing the bill, it’s up to them to set priorities and I happily follow suit. But with Solidity and Ethereum, perhaps more so than with any other programming paradigm, I can unequivocally state that unit tests are absolutely necessary.
Determining what went wrong with a reverted transaction is difficult. While Truffle allows you to debug transactions, the process is tedious at best. Inspecting the state of a deployed contract isn’t as simple an undertaking as with most database platforms. Plus, the language is evolving rapidly enough that you may have to endure multiple deprecations during the course of a six-month project. Ensuring that your code continues to work throughout all this is impossible without including your unit tests in the critical path.
In short, without unit testing, you won’t get far with Solidity development. Write the essential parts of your contracts, test them, and then move on to building the UI that interacts with them.
The Code Under Test
In the previous installment of this series, we saw some examples of contract code from the In-App Pro Shop project, focusing mainly on inheritance, methods, modifiers, and events. In order to frame the subject of unit testing, we need to understand a little more about data structures and pick one of our contracts to test.
The very first use case for the application is that a user should be able to create a Shop. Until that happens, there’s nothing else for them to do. So let’s have a look at the parts of the code that support that, and the unit tests that ensure it works.
Shop Data
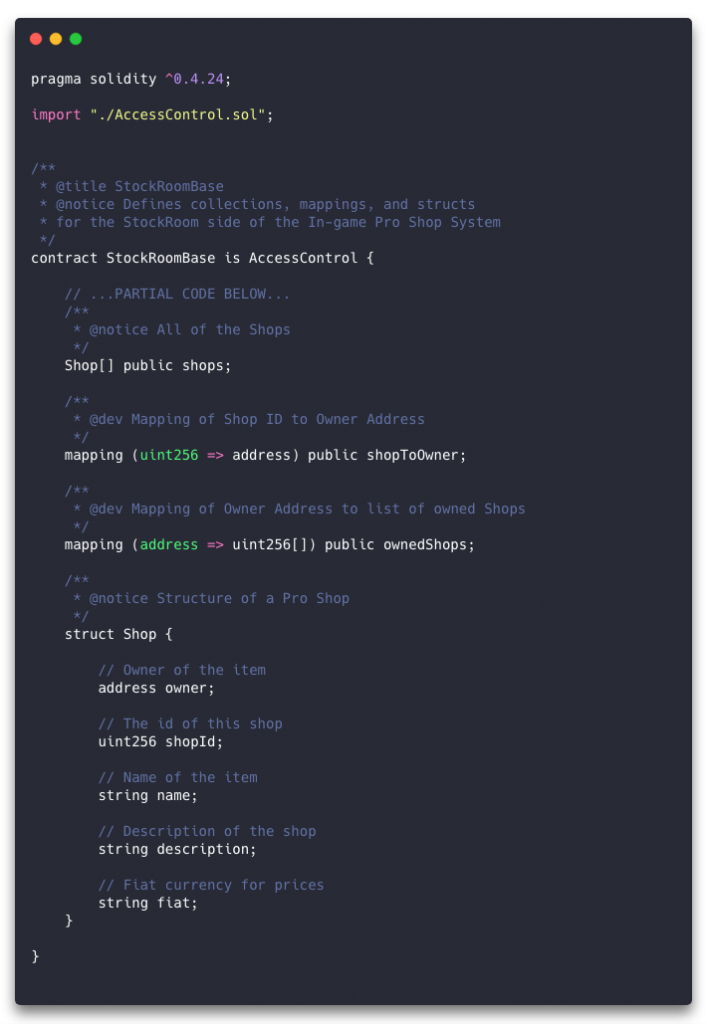
In this excerpt from StockRoomBase.sol, we see the data structure and contract state variables associated with maintenance of Shops.
The Shops Array
First, we have an array of type Shop called “shops”. This will hold all the Shops created by users of the system. That’s a pretty straightforward and unsurprising declaration of a typed collection.
Next we have a couple of “mappings” called “shopToOwner” and “ownedShops”. In Solidity, mappings are basically key/value pairs, with specific types for key and value.
Mappings
In the case of “shopToOwner”, we have keys of type “uint256” and values of type “address”. ShopIDs are going to be unsigned 256 bit integers, and owners are identified in the system by an Ethereum address. So when we need to determine the owner of a Shop for which we have an ID, this mapping enables a quick lookup.
In the “ownedShops” mapping, we have an “address” for a key and an array of “uint256″s as the value. Since a Shop Owner may have any number of Shops in this system, this mapping is maintained to give us a quick list of all the Shop IDs for a given Shop Owner’s address.
The Shop Struct
Finally, we see a “struct” called Shop. This is a custom data type that defines the structure of a Shop. We have the expected Shop Owner address and Shop ID, then three strings for “name”, “description”, and “fiat”. Of these, the last is the only one that needs any explanation.
Prices need to be set in a stable fiat currency, like USD, so the Shop Owner doesn’t have to change them every time the value of Ether skyrockets or nosedives. Accordingly, we need the Shop Owner to specify a fiat currency for the Shop, and all prices will be expressed in that currency, to be converted to Ether at the time of a purchase.
Shop Factory
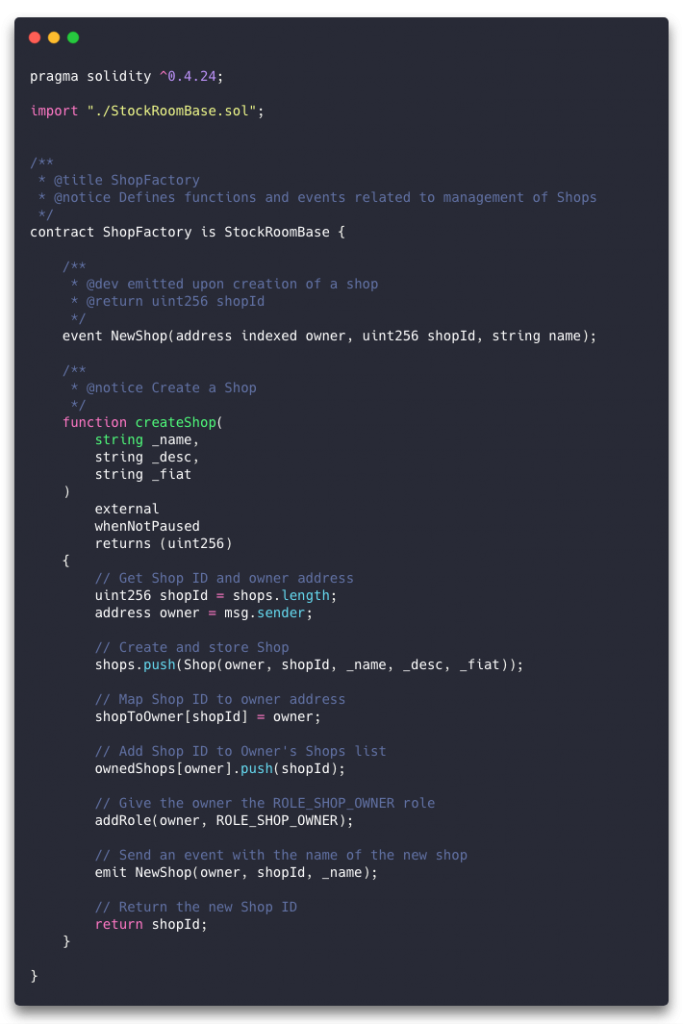
The ShopFactory.sol contract defines the factory method that allows us to create Shops, and defines the event that will be emitted when a Shop is created.
The Event
Let’s look at the event first. It’s called “NewShop” and takes three arguments; “owner”, “shopId”, and “name”. These are all data from the “Shop” structure, and their types are stated here. The one unique thing to take notice of is the keyword “indexed” preceding “owner”. What’s that about?
When a client application listens for events of a certain type from the EVM, they may not want to receive all such events. For instance, if the Shop Owner is using the Shop maintenance application, they don’t need to be notified of every Shop that’s created, only those that they create. Solidity’s “indexed” keyword allows us to filter events based on that field.
The Factory Method
Next, the “createShop” factory method. It takes the three string properties of the Shop struct as arguments; “name”, “description”, and “fiat”. Its modifiers ensure it can only be called externally (not from other methods in this contract), when the contract is not paused. It will return a 256 bit unsigned integer representing the Shop ID.
The first thing it does is define the new Shop’s ID to be the length of the “shops” array. Initially, I thought this should be a UUID-like identifier, based on a mix of the timestamp and a random number or some such. This led to the discovery that creating a random number in Solidity is not a simple endeavor. The simplest thing to do is to use the length of the array for the ID, and if an item is deleted, you just (optionally) clear the data at the deleted location, remove any pointers to it and move on. Access to the data in the array is by mapping anyway, so there’s never really a need to traverse the entire array, and items not in the mapping are for all intents and purposes unreachable.
To be clear, the ID of the Shop is synonymous with its array index. This requires that we not reorganize the array on delete, but that’s fine, because it saves gas.
After getting the new Shop’s ID, we store the “msg.sender” address in a variable called “owner”. Then we create a new Shop structure and push it onto the “shops” array.
Now, we need to update the mappings. First, the Shop Owner’s address is mapped to the Shop ID in “shopToOwner”. Then we push the Shop ID onto the Shop Owner’s array in “ownedShops”. Note that we haven’t had to check that the array was initialized if this is the first Shop for this owner. Nice, right? It just exists when we try to access it.
After updating the mappings, we add the Shop Owner role to the “owner” address. This has no effect if the Shop Owner already has the role, but it’s important that it happen on the first creation. No need to spend extra gas checking for the role before adding it.
Finally, we emit a “NewShop” event, passing the owner, Shop ID, and name.
Shop View Methods
Now that we’ve seen the data structure, state variables, and factory method associated with Shop creation, we have just a couple of other Shop-related methods to review. Those are “view” methods, which simply fetch data from the blockchain. These were refactored out of ShopFactory.sol and into StockRoom.sol during the massive refactor that occurred after the great bifurcation event.
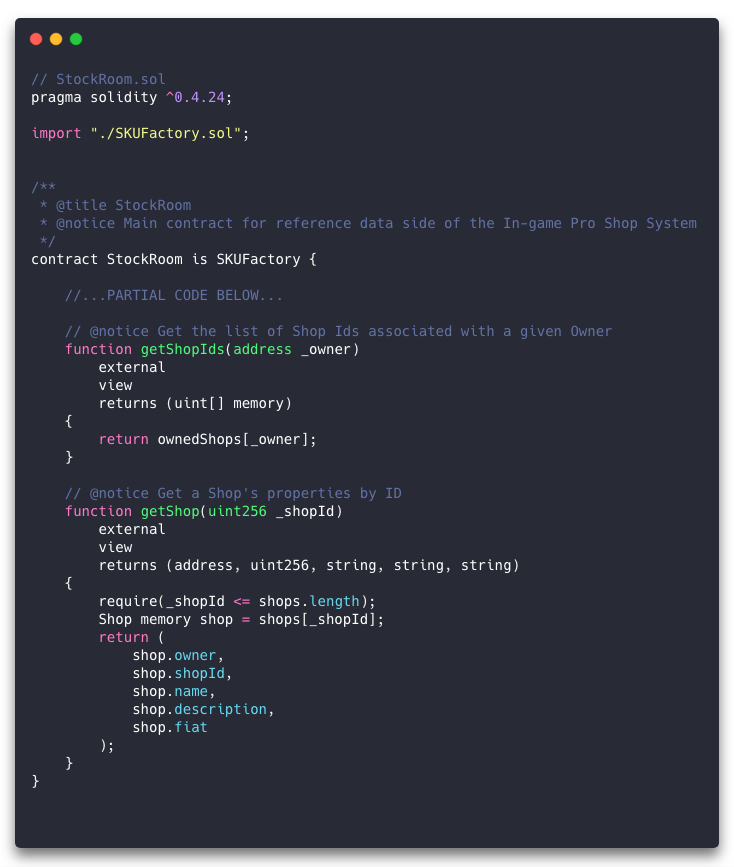
The getShopIds Method
The “getShopIds” method expects a Shop Owner’s address as its single argument, and it can only be called externally. Marked as “view”, it can retrieve data but not write it, and can only call other “view” or “pure” functions. (Tangentially related, the “pure” function modifier means the function has mostly the same limitations as “view”, but is more restrictive in that it can’t read data and can only call other “pure” functions.)
Also note that this method returns a “uint” array marked “memory”. Yikes, what’s this about?
First, if you were paying attention earlier, you know our “ownedShops” mapping maps the Shop Owner’s address to a “uint256” array. Why would we be returning a “uint” array here? Because “uint” is an alias for “uint256”, and can be used interchangeably.
But that’s probably not what threw you. What’s that “memory” modifier? Complex types (i.e., arrays and structs) need to have a “data location” annotation when specified as function arguments or return types. This helps the EVM manage whether copies of data are made in calls between methods.
The getShop Method
Moving on, we have a more interesting method in “getShop”. It’s also marked “external” and “view”, but the return type is unexpectedly weird. Instead of the Shop struct you might think we’d be returning, we actually list five data types.
Currently, Solidity isn’t capable of returning a struct type, but it can return multiple values. So what this method does is get the Shop with the given ID and return all its properties at once. Hopefully, at some point in the future, Solidity will allow returning a struct, which will amount to doing this very thing and keeping us from having to spell out all the struct’s properties’ types here.
Solidity Testing with Truffle
Unit testing Solidity contracts, when using Truffle, can be achieved with JavaScript, TypeScript, or Solidity.
We’re going to use the JavaScript approach, which is done with the Mocha testing framework and Chai for assertions. The main advantage here is that it demonstrates how we will later interact with the contracts from our React application. This is a huge benefit of writing contracts and testing them first. Once we get to the application, talking to our contracts from JavaScript will already be intimately familiar.
Shop Factory Test
In previous installments, we’ve seen where in the project structure our unit tests for the contracts go and how to run them from Truffle console. So, at this point, we’ll just jump right into the ShopFactoryTest.js file and see what’s going on there.
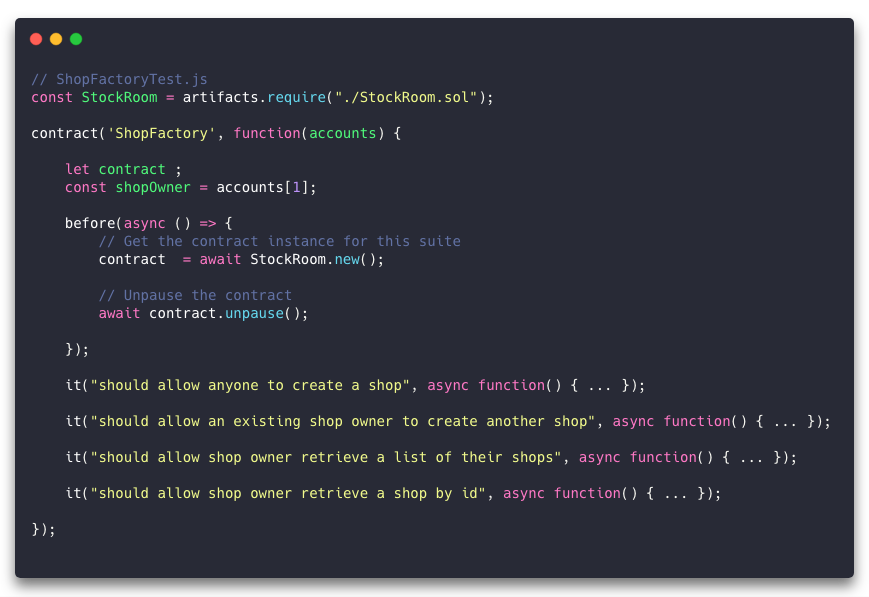
In this overview, the bodies of the individual tests are collapsed, so we can review the structure of the test file. You’ll notice a few differences from ordinary JavaScript Mocha tests.
The “Cleanroom Environment”
One thing to know about the way these tests work is that Truffle will ensure the tests in each file don’t interfere with each other via snapshotting or redeployment of your contracts (depending upon the Ethereum client you’re using). This happens between execution of each test file, not before each test within a file. If you don’t want that, you can place each test by itself in its own file.
Usually, with unit testing, we don’t want one test to depend upon the outcome of previous tests. But for things like making sure that the Shop Owner can create another Shop after creating their first one, and that the Shop ID assigned to that second Shop is the next index number in the “shops” array, it is sort of handy that Solidity testing works this way by default. It’s just important to understand it going in.
Instantiating the Contract
First, we get a manipulatable instance of the ShopFactory.sol contract into by way of the “artifacts.require” statement. This uses Truffle’s “contract abstraction” to represent the contract in JavaScript so that we can manipulate it easily.
Creating the Test Wrapper
Next, you’ll notice we use “contract” instead of “describe” to declare our test set. Here, we’re passing the “contract” function the name of our test set as “ShopFactory”, and the function containing our test set which will expect an array of the account addresses that are available.
Accessing Accounts
You may remember from a previous installment that Ganache generates ten accounts, and we’ve set it up to generate the same ten accounts every time it starts. This means we can hardcode the actual account addresses if we want, but to be safe, we can just refer to the addresses by their array indices. In this test, we’ve said the Shop Owner will be the address at index 1.
Pre-test Setup
The “before” function performs any setup necessary prior to executing all the tests. We’re going to use async/await to simplify the process of instantiating the contract and then un-pausing it. Recall that when our contracts are constructed they are paused. They’re un-paused by the migration script once everything is deployed. Inside the test, however, the migration script isn’t run. We’re using Truffle’s contract abstraction, so we have to un-pause the script here before we can use it.
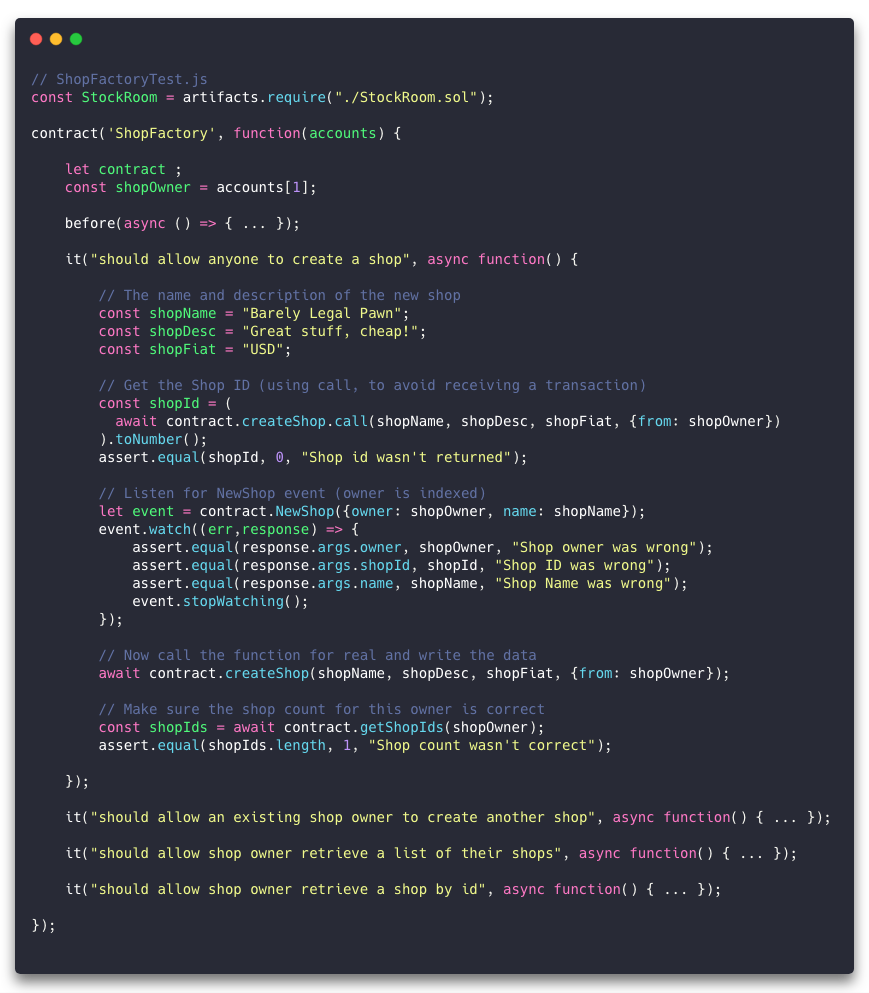
Now let’s have a look at the first test, which confirms that ShopFactory should allow anyone to create a Shop.
Testing the Shop Factory
We know that the “createShop” method on the ShopFactory contract requires “name”, “description”, and “fiat” as arguments. We define those in the constants “shopName”, “shopDesc”, and “shopFiat”.
Next we do something fairly interesting, so pay close attention. We get the new Shop’s ID by invoking the “createShop” method with a chained “call” invocation, into which we pass our arguments. We’re working with a contract abstraction, and one of the benefits is that we can find out the result of the method call without triggering an actual transaction.
Why on earth would we do this? Well, in this case, we want to make sure the Shop ID returned from the method is correct. We make this invocation with “call” and get back a Shop ID, then test that it equals 0. We know that it should be 0 because the contract is brand new, and this is the first Shop created.
Also, notice that we invoke the chained “call” with an additional argument; an object with a “from” property set to the Shop Owner’s address. When the Solidity method is invoked, the “msg.sender” will be set to this address.
Next we set up a listener for the “NewShop” event by getting a representation of the event from the instance of our contract, then using its “watch” method. Inside the handler function that we pass in, we make assertions about the properties of the event, and then invoke “stopWatching” to destroy the listener. Note that we assert that “shopId” will be equal to the Shop ID that we retrieved earlier with the chained “call”.
Once our event listener is in place, we actually invoke the “createShop” method for real by passing it the arguments rather than chaining to “call”. We use await to hold up the thread of execution until the transaction is complete, then we go ahead and fetch the Shop IDs for the Shop Owner invoking the “getShopIds” contract method, and assert that its length is 1.
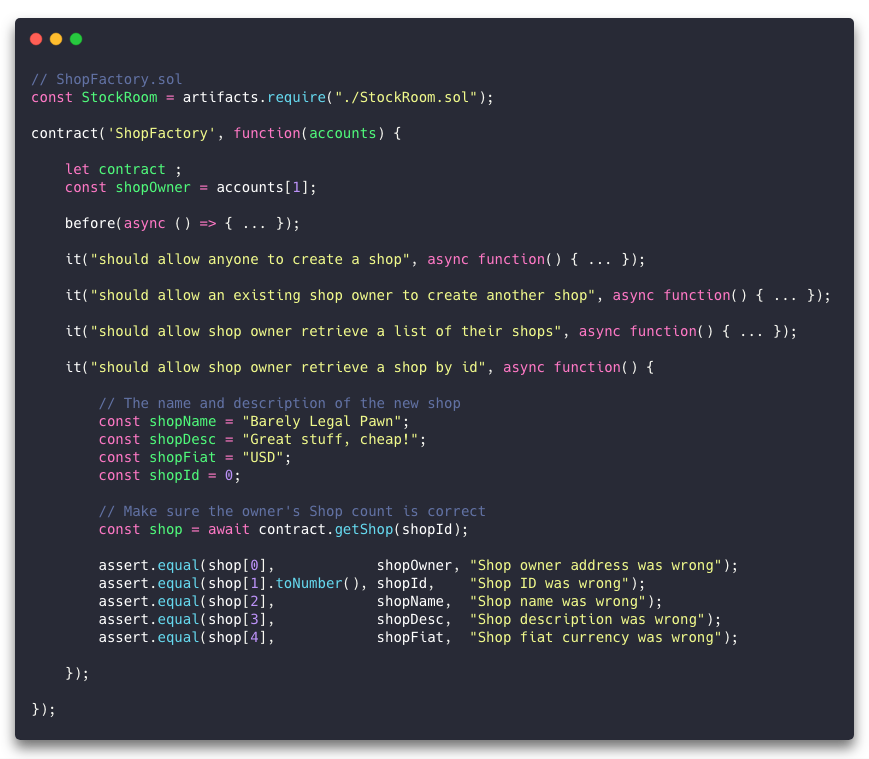
That’s the first test in this set. The next two are very similar. Lets have a look at the last test, which fetches a Shop.
Testing the getShop Method
Here we’re going to retrieve the Shop we created in the first test. We know what the values should be, we just need to test that they’re returned properly when we invoke the “getShop” contract method. Remember, that since we couldn’t return a structure, we had to return the individual properties. Unsurprisingly, that shows up as an array. We just have to make assertions against each of its elements.
The only really notable part of this test, then, is that the element that we compare to the “shopId” constant we defined is converted to a numeric value using “toNumber”. That’s because the Shop ID is a “uint256”, which is represented on the JavaScript side as a BigNumber instance and won’t be cast to Number in an expression.
Running Tests
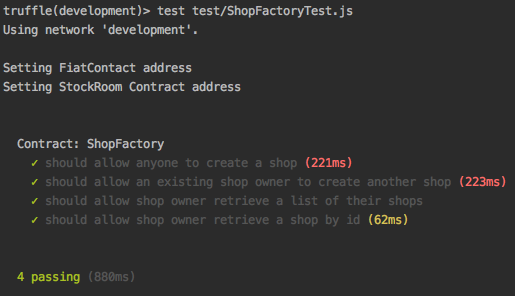
With Ganache already running, from the Truffle Console, we can just type “test” to run all the tests it can find, or we can specify just which tests we want to run. In this case, we’ll just run the ShopFactoryTest.js test.
(Not the) Conclusion
Even though unit testing might not be anybody’s favorite pastime, it’s definitely a necessary evil when it comes to Solidity. The bright spot is it gets us up close and personal with our contracts. We can be certain they’re doing good stuff and learn all about interacting with our contracts at the same time, well before we start building our application. That means it should be smooth sailing once we start engineering our UI.
Coming soon in Part 6, we’ll dive development of the React UI.
