
 In this series, I’m discussing the phases of a project encompassing a non-trivial set of Ethereum smart contracts and the React/Redux application that communicates with them.
The project, called In-App Pro Shop, aims to help Ethereum developers easily support in-app purchases as ERC-721 Non-fungible Tokens (NFTs).
- Part 1 – Decisions
- Part 2 – Functionality
- Part 3 – Setup and Test
- Part 4 – Writing Contracts
- Part 5 – Writing Tests
- Part 6 – Bootstrapping the Client
- Part 7 – Client to Contract Communications
- Part 8 – Deployment
NOTE: While this series is now slightly out of date, the project itself and the published book are updated.
A Time Will Come
So far in this series, we’ve seen how to set up a Ganache-cli Ethereum client that we can use to do local testing. For all intents and purposes, it is the blockchain to us. And the great thing is, no one else can see our code or our transactions. While our accounts get 100 Ether by default, we can give ourselves as much as we like using the “–defaultBalanceEther” option, so we can test to our hearts delight in our safe little cocoon.
But at some point, you have put it out there and let other developers start interacting with your contracts. What’s involved with that?
Spreading Our Wings
First, let’s consider the question of what’s being deployed and where.
Frontend Deployment
According to BlockchainHub, the frontend of a so-called “dApp” can be deployed to a decentralized network such as Swarm or IPFS. Like Ethereum itself, these networks use decentralization to ensure that no one computer (and thus no one person or organization) has control of the data or application.
That’s a wonderful concept, but there are a few problems with it at the moment:
- The networks are just too slow.
- The gateways are too few and often offline.
- They serve only static files, which precludes things like server rendering of a React or Angular app.
In the future, perhaps this situation will change, but I doubt it. The main thing that we want distributed is the data, and that’s in our contracts, to be deployed to the blockchain.
Build the React App
Thus far we’ve been running the local server the Create React App scripts offer us while developing. Now we need a production build. After the following, you should end up with a “build” folder containing the deployable build. Only that folder needs to be deployed.
- In package.json, change the “homepage” entry to be the URL you’ll be deploying to. This is important because React infers certain things about the location of assets based on this entry.
- Build the React application:
npm run app:build
Pick a Hosting Service
So, for this project, deployment only requires an ordinary hosting service. If you have a hosting provider you’re happy with, just skip the following parts. For instance, you could use Github Pages if you wanted. In this case, we’ve already set up Github Pages for the project to serve a docs page, so we’ll need to host the app elsewhere.
For our purposes, we’ll use Firebase. Google offers a most generous free tier with their Firebase hosting product. And it’s possible that we will want to extend the application with a backend that tracks usage or provides other off-chain services. Firebase’s realtime NoSQL database, cloud functions, and cloud messaging make it an excellent platform choice for the growth potential it offers.
In order to achieve this, only a few steps are necessary. I won’t go into great detail since it’s an aside from the business of writing an Ethereum dApp, much as using Styled Components for applying CSS to the UI components was not integral to understanding the process, but was an ancillary decision for making the app look pretty.
If you know Firebase, this will be old hat. If not, you might have to read a few paragraphs of their docs along the way while the following these basic steps. It’ll be worth it, though. Firebase is awesome. But again, any hosting service will do, and the app itself isn’t dependent upon Firebase in any way.
Deploy to Firebase
We’re currently not talking to the Firebase backend from our client, only hosting it, so it’s super easy. In order to deploy the project to Firebase:
- Go to the Firebase website and create an account or log into your console if you already have an account.
- Create a new project.
- Connect a custom domain or subdomain to your project OR take note of the project url (e.g., https://myproj.firebaseapp.com).
- Install the Firebase tools on your development machine if you don’t already have them.
npm install -g firebase-tools
- Log in with the account used to create the project.
firebase login - Create a .firebaserc file with the name of the project set as default. The one in the project points to the project name I’ve deployed it to. If you’re deploying a copy of the project for testing, you’ll need to change this to the project name that you just created in step 2.
- Create a firebase.json file, which will tell the firebase tools what directory to deploy, what files to ignore when uploading, and what headers to send when someone requests the site. The one in the project should work perfectly without modification.
- Deploy the application to hosting:
firebase deploy
Contract Deployment
As you’re aware by now, deploying contracts and testing them costs Ether. We have plenty of that available to us on our local Ganache-cli instance, albeit simulated and only usable locally. But on the Ethereum mainnet, we need actual cryptocurrency to deploy.
Fortunately, before we have to make that plunge, there are the testnets. And with them, faucets.
Pick a Testnet
There are a number of public testnets out there. The most popular, perhaps due to support from Etherscan and Infura are:
- Ropsten – Cross-client testnet
- Rinkeby – Geth client testnet
- Kovan – Parity client testnet
- Görli – POA client testnet
We’ll deploy to Ropsten. But how do we do that?
You can deploy via Remix, the Ethereum browser-based IDE. However, with a project of this scale, you don’t want to be cutting and pasting the contracts into the browser. That’s mainly for simple experiments.
We could also deploy with a fully functional network node, which is a bit beyond the scope of what we’re trying to do. That’s generally what you want to have in order to set up an mining operation.
For a non-trivial project such as ours, Infura is our easiest way to deploy to a testnet. Infura is free to use. It was created within Consensys which also brings us, among other amazing projects, the Truffle Framework and MetaMask, which we’re already quite cozy with.
First, however, we need some faux Ether so we can deploy to Ropsten via Infura.
Get Some Ether from a Faucet
 You presumably have MetaMask installed by now, but if not, head on over to MetaMask and install it in your Chrome or Firefox browser.
If you’re just installing it, while you are there, be sure to watch this video, which is embedded in their page. It describes how to operate MetaMask and is very helpful if you’re not familiar with it.
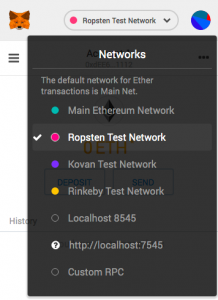
Next, make sure the Ropsten test network is selected as shown in the screenshot.
Now go to the MetaMask Ether Faucet and request some Ether by clicking the big green button. You will be asked to allow the faucet to connect to your Account.
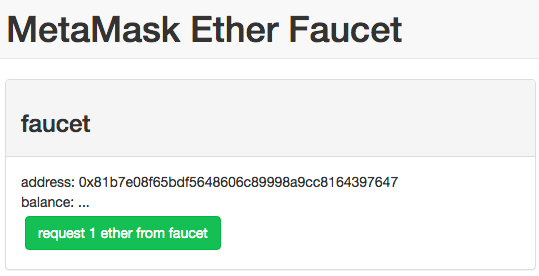
You’ll see the transaction id and if you click it, it will take you to Etherscan, where you’ll see that the transaction is pending.
In a minute or so the transaction will clear and you should be good to go. You now have enough play Ether on Ropsten to deploy your contracts.
Copy your Seed Phrase
MetaMask created an account for your use, into which you just added 1 Ether. But in order for us to deploy using that account, we need the “seed phrase” or “mnemonic”. It is a set of words that are used to generate your public and private keys.
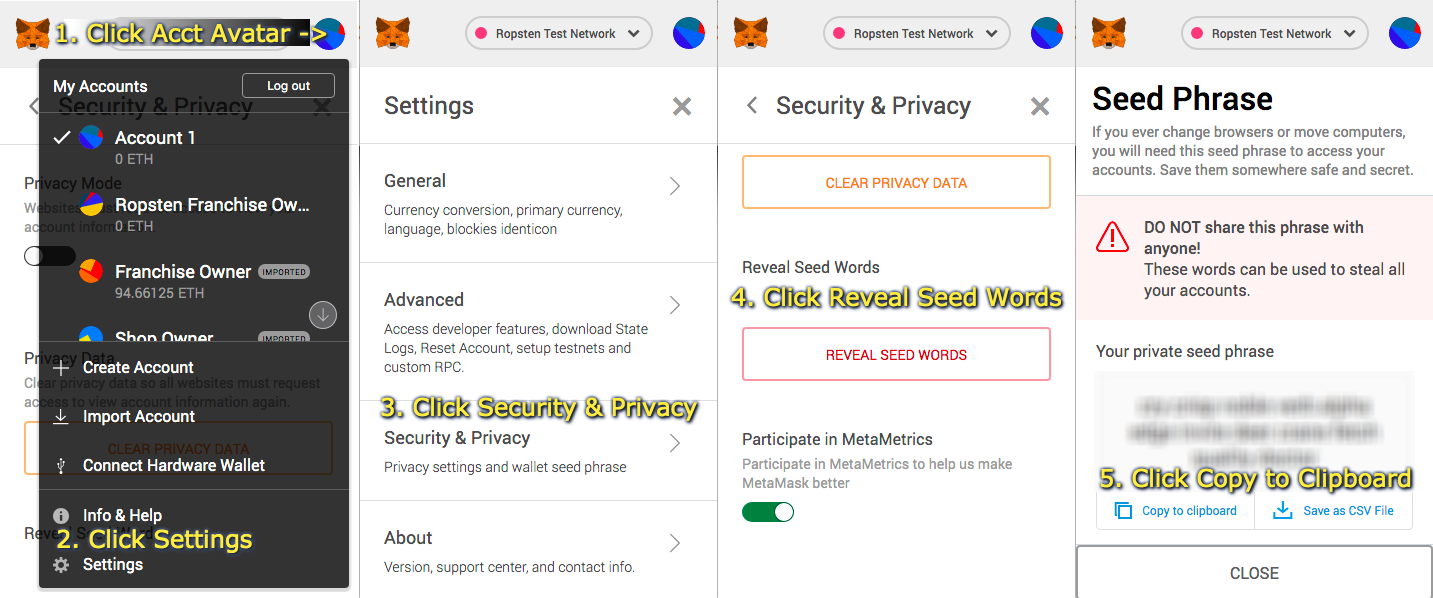
- Click the Account Avatar on the right side of the MetaMask popup.
- Click the Settings menu option.
- Click the Security and Privacy menu option.
- Click the Reveal Seed Words button.
- Enter your password to reveal the Seed Words then click the Copy To Clipboard button.
Deploy with Infura
This is a super streamlined process so, hold on to your hat!
- Go to the Infura website and create an account or log into your dashboard if you already have an account.
- Click the “Create Project” button on the dashboard and give your project a name.
- You’ll see all the keys and urls associated with the project now. Copy the Project ID.
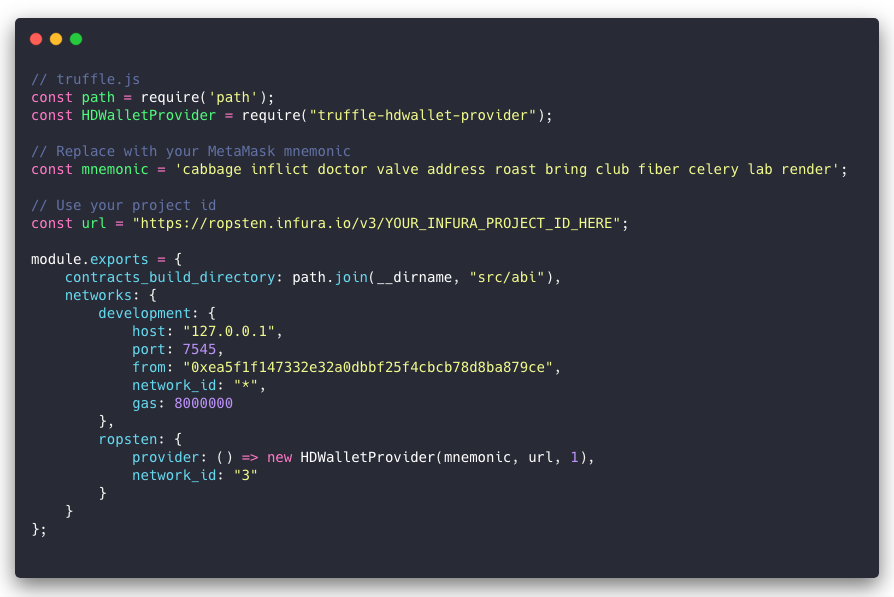
- Edit the truffle.js file and update the URL for Ropsten network with your Project ID and your MetaMask mnemonic (which you copied to the clipboard earlier).
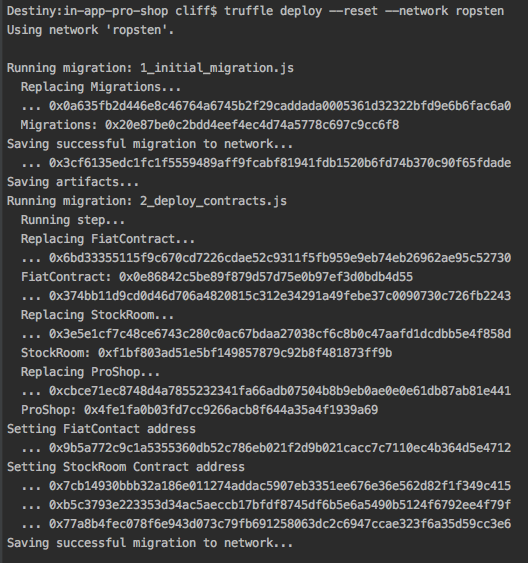
- Migrate contracts with the command: “truffle deploy –network ropsten”
Generating Transactions in the App
Woohoo. Now the contracts are deployed. And your application should talk to it. Navigate to the web URL where you deployed the app and it should ask if you want to allow the app to connect to your account via MetaMask. Click Accept and you should be able to create Shops, Categories, and Items.
![]() If you’re just following along, just head on over to https://iaps-test.futurescale.com and give it a whirl!
If you’re just following along, just head on over to https://iaps-test.futurescale.com and give it a whirl!
That’s an instance of this project deployed as described above. If the app doesn’t appear to connect or you don’t see the MetaMask popup asking you for permission to connect to your account, kill your browser and launch it again.
After filling out the New Shop form, for instance, MetaMask will show show you the terms of the transaction and ask if you want to confirm it.
In this case, there is no actual Ether amount to be transferred, only the gas fee.
Viewing Transactions and Accounts on Etherscan
After what seems like forever (maybe half a minute), MetaMask will notify you that the transaction is complete.

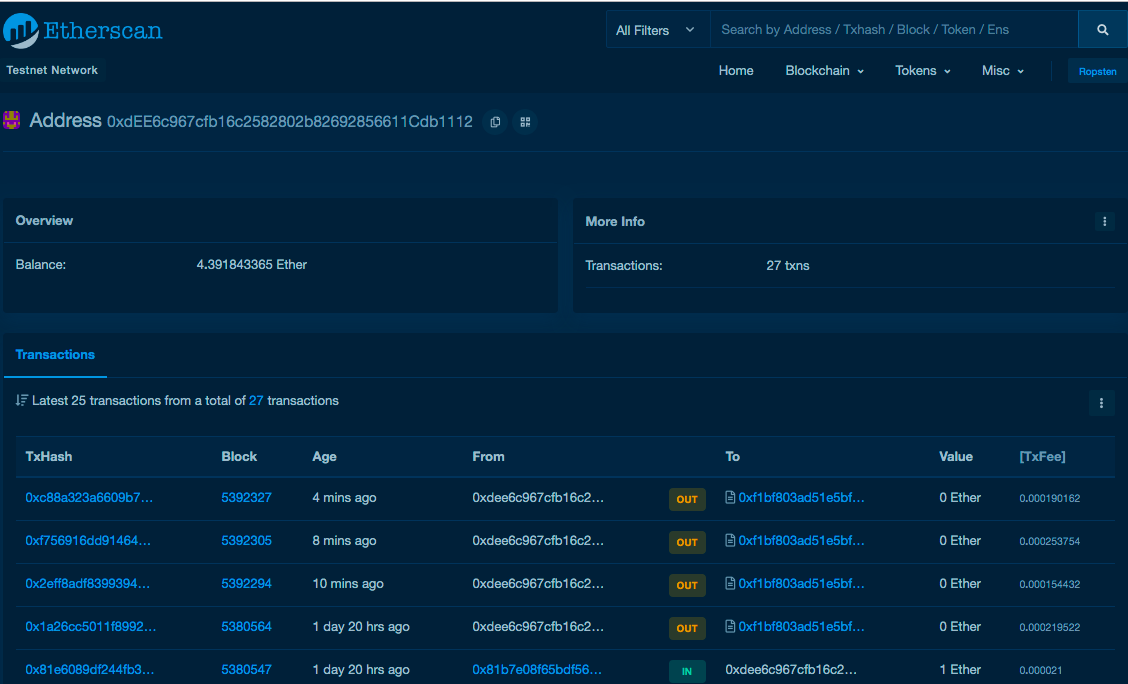
If you click the browser notification, it will take you to Etherscan where you can view the details of the completed transaction.
![]()
The From and To addresses are links. They take you to the the account that initiated the transaction and the contract that received it.

In the app, when you are connected to a network supported by Etherscan, you can view the account on Etherscan from the Accounts menu. However you get there, Etherscan’s page for an address shows all the transactions for that address as well as its balance.
Conclusion
In this installment, we’ve seen how to deploy the application to a hosting provider (Firebase), how to get Ether from a faucet, how to get our seed phrase from MetaMask, how to configure Truffle to deploy to the Ropsten testnet, and finally, how to use Infura to do the actual Ropsten deployment.
And with that, this series finally comes to an end. However there is a lot more depth to be explored in the codebase, and so I plan to expand on this series in an eBook soon. In the meantime, I hope you’ve enjoyed this tutorial and will get some use out of the project, whether you’re just exploring Ethereum, or looking to build on it to enable in-app purchases.