
 In this series, I’m discussing the phases of a project encompassing a non-trivial set of Ethereum smart contracts and the React/Redux application that communicates with them.
The project, called In-App Pro Shop, aims to help Ethereum developers easily support in-app purchases as ERC-721 Non-fungible Tokens (NFTs).
- Part 1 – Decisions
- Part 2 – Functionality
- Part 3 – Setup and Test
- Part 4 – Writing Contracts
- Part 5 – Writing Tests
- Part 6 – Bootstrapping the Client
- Part 7 – Client to Contract Communications
- Part 8 – Deployment
NOTE: While this series is now slightly out of date, the project itself and the published book are updated.
Preparation
I plan to develop more in depth courseware that starts from the ground up, creating the project and layering each part of the contract development into separate modules. For the purposes of this series, however, we’ll start with the finished project and review the various parts, getting familiar with the toolchain and how the project structure came to be as it is.
By the end of this post you should have all the necessary tools installed with the project up and running on a local machine.
If you don’t want to install the project and all the tools right now, you can just skip over the setup instructions below and follow along with the discussion, referring to the code on Github. In the text, I’ll link directly to the specific files or folders mentioned.
Install Node & NPM
As with most modern web development projects, you’ll need Node and its package manager NPM installed, so if you don’t have them, go install Node and NPM will come along with it.
Get the Project
Get the latest version of the In-App-Pro-Shop project from Github. You can download a zip file or use git to clone it by running the following command in the folder you’d like to install the project under:
git clone https://github.com/cliffhall/in-app-pro-shop.git
If you don’t have a git client installed, it’s never to late to join the fun. Either way, when you’re done you should have an in-app-pro-shop folder with the project source in it.
Install Node Modules
In a Terminal window (or on Windows, a Command Prompt), navigate to the project folder and install the Node modules. Further instructions will assume you are located in the project folder.
cd path/to/in-app-pro-shop
npm install
What were all those modules we just installed? They’re configured in package.json, and we touched on them briefly at the end of Part 1. They came about as the result of a tree of decisions about what to build on. The main dependencies are:
- React-scripts for managing webpack configuration, compilation, testing, code watching, local server.
- Babel-core for ES6/7 support.
- Redux-thunk middleware for asynchronous action creators.
- React-bootstrap for UI components.
- React-app-rewired for webpack config overrides to support Styled Components.
- Styled-components for easy application of CSS in JS.
- Drizzle and Drizzle-react for interacting with the blockchain and keeping data fresh.
- Openzepplin-Solidity base contracts for ERC721 tokens, role-based access control, safe math, etc.
Setup the Blockchain Toolchain
Ganache-CLI
This tool runs a local blockchain for you to communicate with. You need this, because deploying to a public test net with every change to a contract would be, well… crazy. Installing it globally allows you to use it across different projects.
npm install -g ganache-cli
If you’re on a Mac, for global installations, you will need to add sudo to your command:
sudo npm install -g ganache-cli
Truffle
This lovely tool allows you to do lots of things including compiling and migrating (ETH-speak for deploying) your contracts, debugging transactions, and more.
npm install -g truffle
Test the Blockchain
Start Ganache
At this point, you should be ready to startup the local blockchain. To do that, you’ll run an npm script that’s configured in package.json called ganache:start:

First, a few words about this script.
It invokes ganache-cli passing arguments that define the port number (7545), a gas limit that roughly matches what the Main and Test nets are running (8000000), that Ganache should run in deterministic mode (meaning that it will generate the same default set of accounts every time), and the mnemonic (which generates the random seed used for account generation, and is required in deterministic mode).
We need to run in deterministic mode so that our tests can use the same hard-coded account numbers each time we run them.
Launch a new Terminal window and run the following command:
npm run ganache:start
You should see something like the following output:
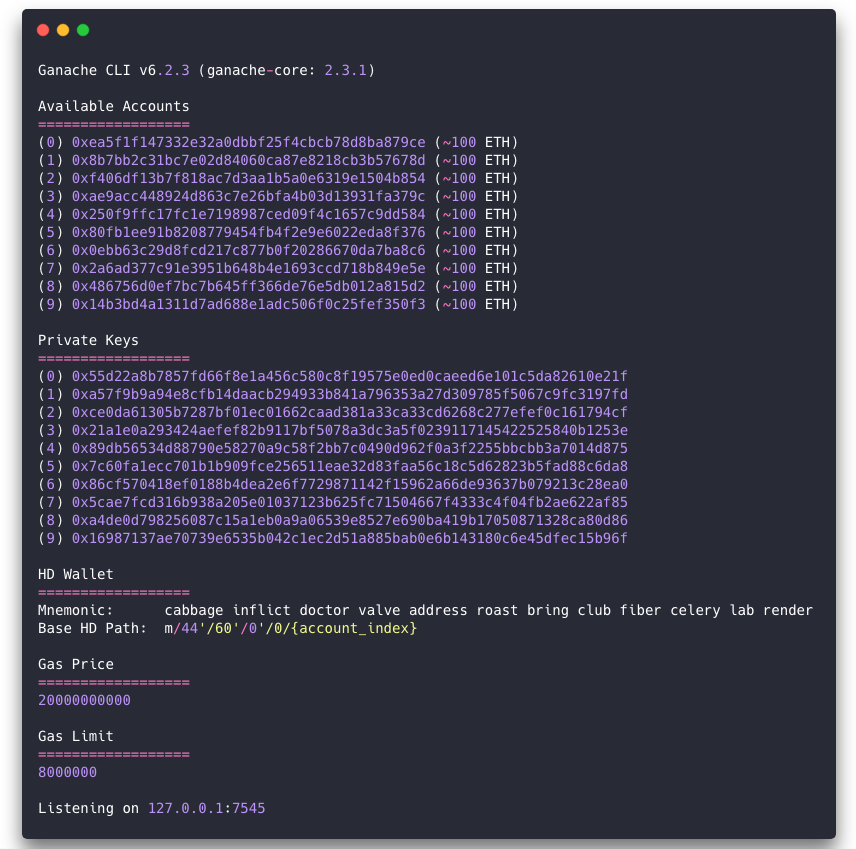
Note that Ganache has initialized the balances of all ten default accounts with one hundred ETH each. Also notice that it has listed the private keys for each of the accounts it generated. Remember this because later, we’ll need to configure the first three accounts with MetaMask in the browser using their private keys.
Start the Truffle Console
The Truffle console lets you deploy your smart contracts, send and debug blockchain transactions, and more. It needs to know a few things about how to connect to the blockchain when it comes up. This is configured in the file called truffle.js:
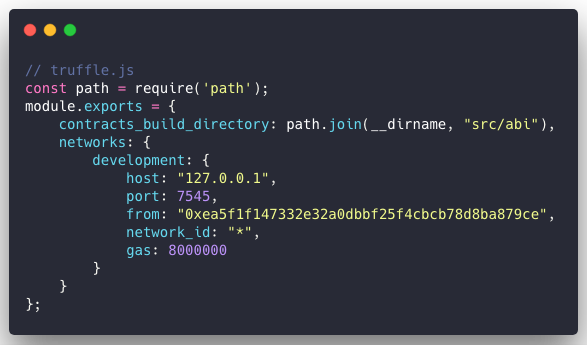
This file defines where the compiled contracts will go and our local development network’s parameters, namely the host, port, gas limit, and default source account for transactions.
In a new Terminal window, run the following command:
truffle console
And since it isn’t very verbose, you’ll just see the truffle prompt:

Migrate Contracts
As mentioned earlier, the process of compiling and deploying your contracts to the blockchain is called migration in ETH-speak. Currently we have our blockchain up and running and a Truffle console connected to it. before we can do anything else, we need to migrate.
At the truffle prompt, enter the following command:
migrate --reset
This will compile the contracts and deploy them to the blockchain, outputting something like this:
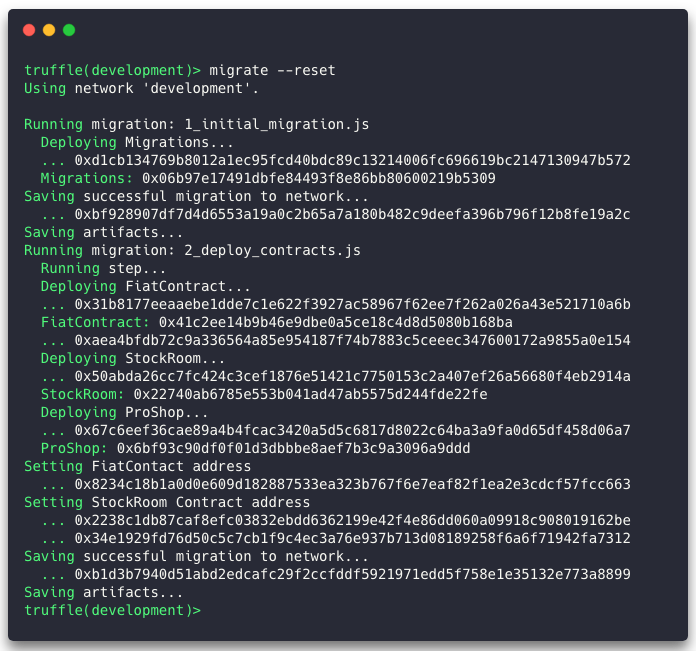
Assuming all went well, we now have the In-App-Pro-Shop contracts up and running on the local blockchain.
Test Contracts
It would be crazy to attempt smart contract development without unit tests. Our unit tests for the contracts are located in the top-level test folder of the project. We can get a quick sanity check that everything is working as expected by launching the tests from within the Truffle console.
At the truffle prompt, just run:
test
When the tests complete, you should see the following output:
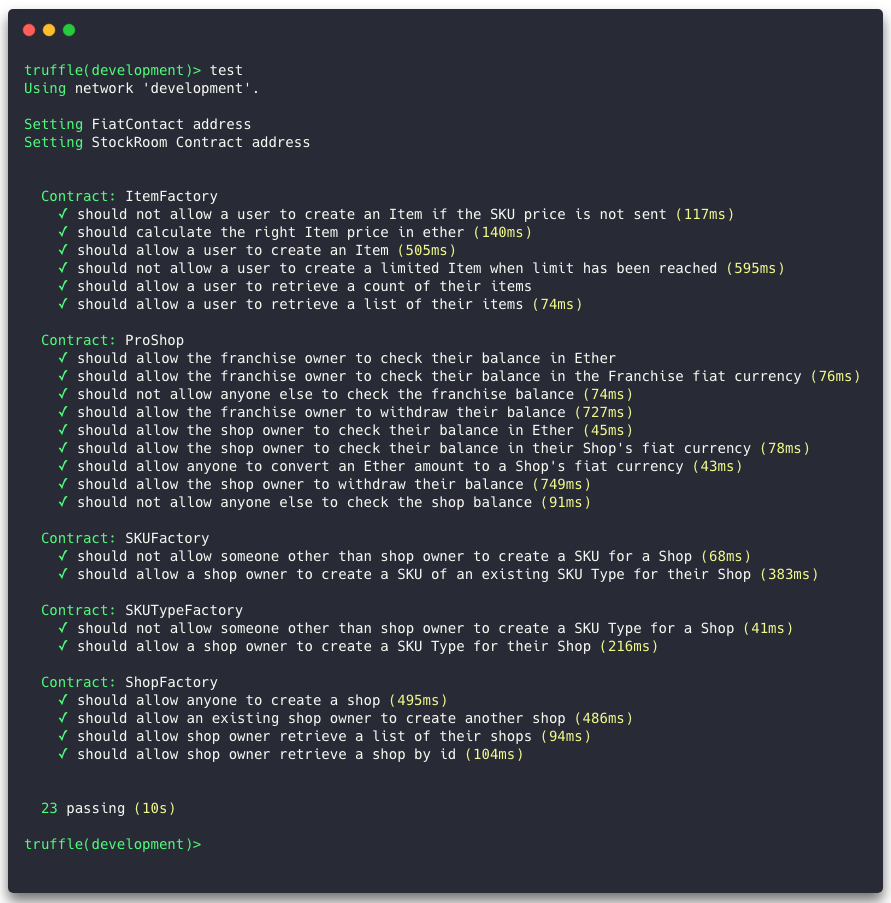
We’ll go further into how the unit tests are coded in a future post. For now, suffice it to say that we can be confident the contracts are deployed and operating as expected.
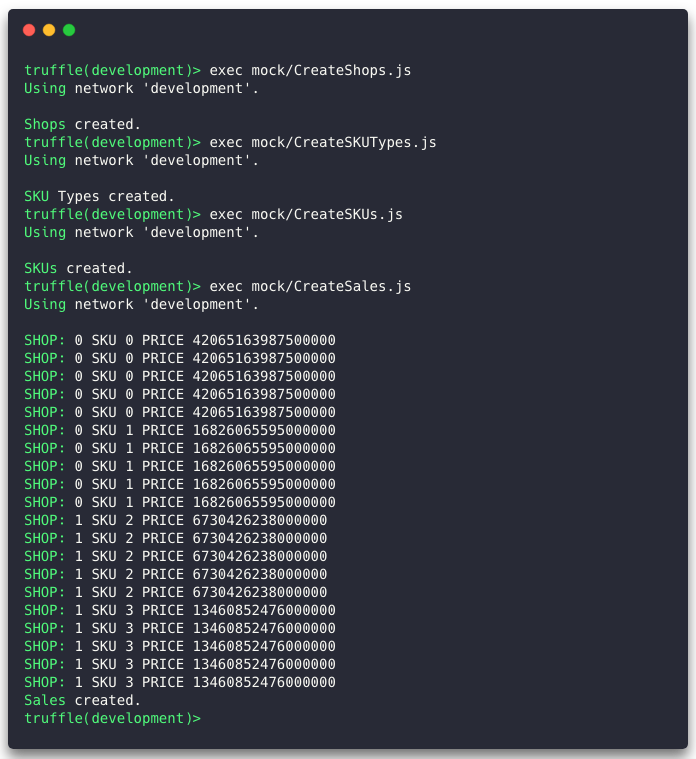
Create Mock Data
Next we want to create some mock data that the application can use when when launch it. The unit tests created their own instances of the contracts, so that data won’t be visible to the application. In order to create the mock data, we will use the Truffle console to execute some Javascript that communicates with the deployed contracts.
At the truffle prompt run the following commands in order:
exec mock/CreateShops.js
exec mock/CreateSKUTypes.js
exec mock/CreateSKUs.js
exec mock/CreateSales.js
You should see output resembling this:
Test the Client
Compile and Serve the Application
The blockchain is running, the contracts are deployed and tested, and the mock data is installed. We’re ready to compile and serve the client application.
Return to the original Terminal window that you installed the project in, (or if you closed it, open a new one and navigate to the project folder).
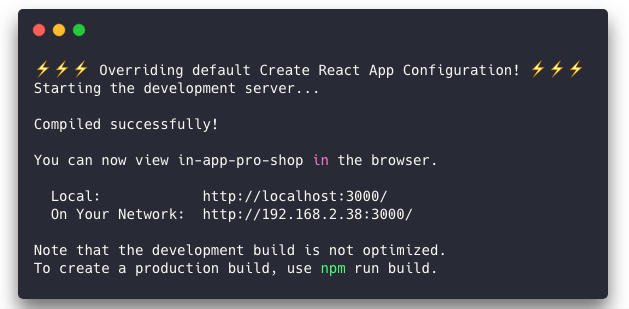
As mentioned in Part 1, the client application is built on React and uses react-scripts to compile and serve the application. If you’ve ever used create-react-app, this startup process will be familiar. At the system prompt, just run the following command:
npm run app:start
The output should look similar to this:
Install MetaMask Browser Plugin
 The MetaMask plugin allows users to specify their Ethereum accounts and their associated private keys.
Then, when they navigate to a web app that would like to use their account(s) to perform transactions on the blockchain, they are asked if they’d like to connect their account.
Users will generally be using MetaMask plugin or the Brave Browser, both of which you can install from https://metamask.io/.
Once you’ve installed MetaMask, do the following:
- Click the MetaMask icon on the browser’s toolbar
- Open the Network dropdown (may show ‘Main Ethereum Network’)
- Choose Custom RPC
- Accept the defaults for Currency Conversion, Primary Currency, and Language
- Scroll down to New Network
- In the New RPC URL field, enter http://localhost:7545
- Click the Save button
- Make sure Private Network is now shown in the network dropdown
Add an Account
Now MetaMask knows about your network, but it still doesn’t know about any accounts on it.
Remember earlier, when I mentioned that we needed to run Ganache in deterministic mode so it would create the same accounts every time? Well, not only is that important for our hard-coded accounts in unit tests, but we need to enter one or more of those accounts into MetaMask so we can interact with our local blockchain data.
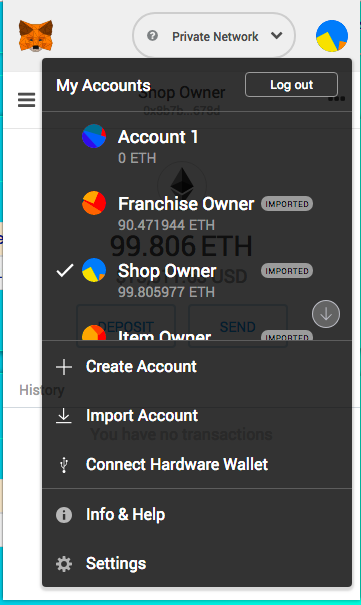 MetaMask will have created a default account, which is useless to us. Its generated avatar is on the right side of the MetaMask window when you click the icon on your browser’s toolbar. If you click that avatar, you’ll see the My Accounts window. “Account 1” is the throwaway account we don’t care about.
- Click the Import Account menu option
- In your Ganache terminal, scroll back to the Private Keys it output when you started it. The first key (0) is for the the Franchise Owner’s account. Copy it and paste it into the Private Key field.
- Click the Import button. The My Accounts window will close and the new account will be imported as “Account 2”
- Click the hamburger menu (on the left of “Account 2”). You’ll see a window with info about the account. Beside the account name is an edit (pencil icon) button. Click it and change the name to “Franchise Owner”
- Repeat all the above steps to import the second private key in Ganache’s list, and name the account “Shop Owner”
- Import the third private key and name the account “Item Owner”
Open the Client App in a Browser
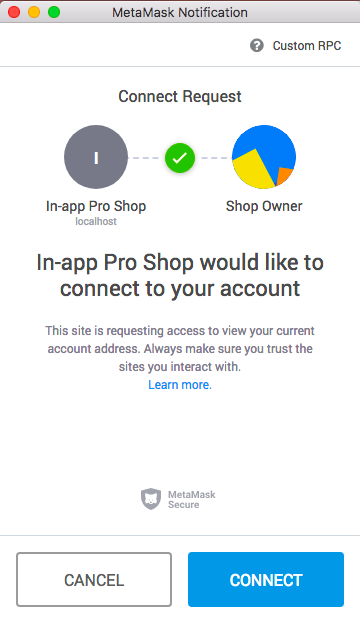
Now all you need to do is make sure the Shop Owner’s account is selected in MetaMask, then open http://localhost:3000/ in a new browser tab.
MetaMask should ask you if In-app Pro Shop can connect to your account as in the Connect Request screenshot above. Click the Connect button and the app should connect to the blockchain and display your account and shops as shown below.
Sometimes the application hangs after this first connection is complete and you have to reload. This appears to be an issue with Drizzle, one of the dependencies we use to connect. This will most likely go away in the near future, but if it happens now, just reload the page, and all should be well.

(Not the) Conclusion
You should now have a working and tested installation of In-App Pro Shop on your machine, or at least understand what it takes to make that happen. This gets all the installation of code and dependencies out of the way. You can nose around in the codebase and even fiddle with it if you’d like, until next time, when I dive into the structure of the smart contracts and their tests.
Next up, in Part 4, we’ll move on to the process of actually writing the Solidity contracts.
Hello,
Your github says “do not install node 12”, at https://github.com/kvutien/in-app-pro-shop#build–run–deploy-prerequisites
it refers to a truffle suite note of 2 June 2019: https://github.com/trufflesuite/truffle/issues/2070
down in this note in 10 jan 2020 Cruz Molina said the issue with node12 is solved:https://github.com/trufflesuite/truffle/issues/2070#issuecomment-573198692
Indeed I’m using happily node 12.18.4 for 6 months now. But on my config with node 14 ‘truffle develop’ can’t deploy its ganache.
So you may want to update this section of your github?
My config:
$ truffle version
Truffle v5.1.46 (core: 5.1.46)
Solidity v0.5.16 (solc-js)
Node v12.18.4
Web3.js v1.2.1
Correction to my comment. You’re right.
I did npm install on your github with node 12 and indeed it failed.
I changed to node 10 and did again npm install and it worked. I’m continuing. Thanks for the detailed instructions.
My config is now:
$ truffle version
Truffle v5.1.46 (core: 5.1.46)
Solidity – ^0.5.13 (solc-js)
Node v10.24.1
Web3.js v1.2.1