
Previously, in the ongoing chronicle of our quest to build a music visualizer for recording artists, I discussed my attempt to render thirty audio-modulated frames per second with Three.js and send them to the server in realtime for compiling into a video. What I discovered was that this is impossible with ordinary hardware, such as our eventual customers might be using.
That’s really too bad, since I could see almost twice that number of frames flying by in the browser, with objects in the scene all dancing around to the beat. So close, but yet so far. The downfall was the time it took to extract each rendered frame from the canvas.
In this installment, I’ve taken the tack of extracting the audio spectral data in one pass, and then using those snapshots in a second rendering pass. This takes a bit longer, but there is an upside: I can output at a higher frame rate! 48 FPS is much smoother than 30, and since we’re no longer concerned about generating frames in realtime, why not shoot the moon?
I won’t post all of the code here, since it is largely an evolution of last week’s demo, but you can pick it up from this GitHub Gist. Suffice it to say, this week’s endeavor was a success. You can load an arbitrary audio file and a music-responsive video will be rendered.
Read on to understand how all the pieces fit together to make it possible.
Serendipitous Asynchronicity
In the code associated with the previous experiment, I was only rendering frames. I extended that to extract a snapshot of the audio activity on the fly, using the Web Audio API and specifically the AudioBufferSourceNode‘s onaudioprocess callback.
Those snapshots were used in realtime to manipulate the scene being rendered. We’ll get into how that’s achieved in a moment, but once it was done, my first thought was that I should just be able to push each snapshot onto an array and feed those to the rendering process later.
That was naive. I had no idea how often the callback was being invoked. In my defence, I came up with it while I was asleep. Later, in the shower, sanity prevailed, and I realized how unworkable it was.
In the reworked demo, two independent asynchronous processing loops were happening: audio processing and frame rendering. The only connection between the two was the value object that holds the extracted audio data. How often was the audio being extracted? How often was the scene being rendered? Both could be as good as random. It’s just that each time a frame was rendered, it used the last audio data that happened to have been extracted.
To create a video with a predetermined frame rate, however, we can’t rely on chance to line things up. That means we need a firm grasp on how to manage the timing of the audio processing.
Setting Up the Audio Nodes
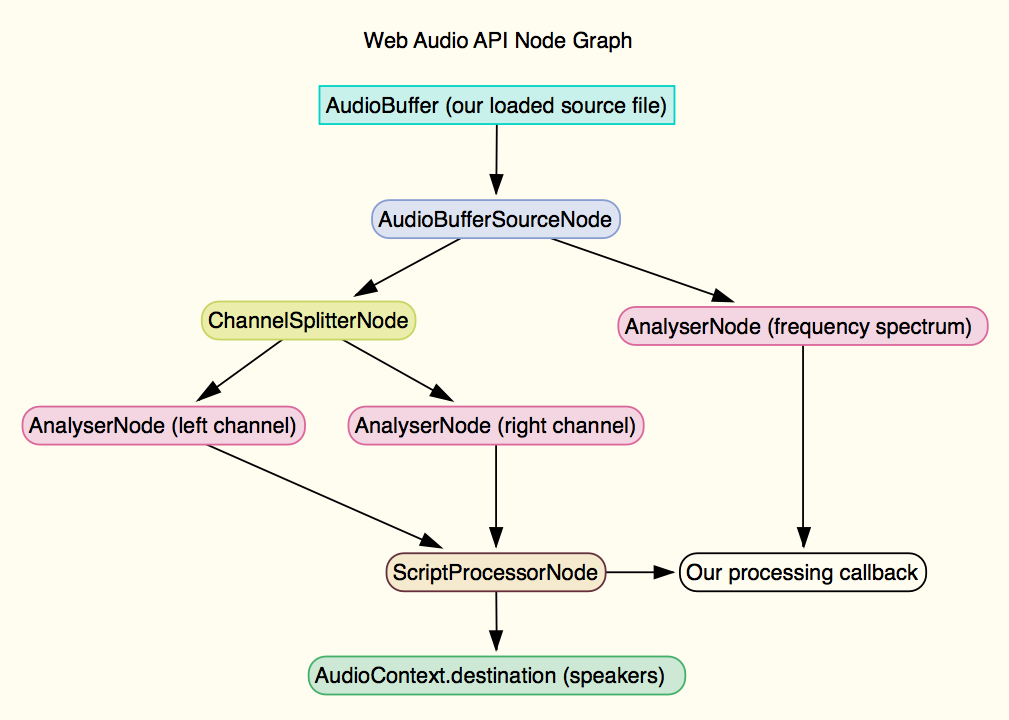
In order to snapshot the attributes of the audio that will be used to modulate the 3D scene elements, we have to set up the AudioContext and a non-trivial pipeline of nodes, including an AudioBufferSourceNode which represents the loaded audio data, a ChannelSplitterNode, three AnalyserNodes for capturing left channel volume, right channel volume, and combined frequency spectrum and volume, and finally, ScriptProcessorNode which will repeatedly call our processing function, alert us when the audio has stopped playing, and output the audio to the AudioContext’s destination, the speakers.
Here’s how all that is strung together:
// Set up audio nodes for playback and analysis
function setupAudioNodes() {
    // If AudioContext is there, create the AudioVO and initialize its AudioContext
    window.AudioContext = window.AudioContext || window.webkitAudioContext;
    if (!window.AudioContext) {
        console.log('No AudioContext found.');
    } else {
        // Set up the audio context
        audioVO.context = new AudioContext();

        //  Set up a script processor node
        audioVO.javascriptNode = audioVO.context.createScriptProcessor(2048, 1, 1);

        //  Set up channel and frequency analyzers
        audioVO.analyser = audioVO.context.createAnalyser();
        audioVO.analyser.smoothingTimeConstant = 0.5;
        audioVO.analyser.fftSize = 1024;

        audioVO.analyser2 = audioVO.context.createAnalyser();
        audioVO.analyser2.smoothingTimeConstant = 0.5;
        audioVO.analyser2.fftSize = 1024;

        audioVO.analyserFreq = audioVO.context.createAnalyser();
        audioVO.analyserFreq.smoothingTimeConstant = 0.3;
        audioVO.analyserFreq.fftSize = 256;

        // Create a buffer source node and splitter
        audioVO.sourceNode = audioVO.context.createBufferSource();
        audioVO.splitter = audioVO.context.createChannelSplitter();

        // Connect buffer source node to frequency analyser and splitter
        audioVO.sourceNode.connect(audioVO.splitter);
        audioVO.sourceNode.connect(audioVO.analyserFreq);
        audioVO.sourceNode.onended = finished;

        // Connect outputs from splitter to channel analysers
        audioVO.splitter.connect(audioVO.analyser, 0, 0);
        audioVO.splitter.connect(audioVO.analyser2, 1, 0);

        // Connect the analysers to the javascriptnode
        audioVO.analyser.connect(audioVO.javascriptNode);
        audioVO.analyser2.connect(audioVO.javascriptNode);
    }
}
Pre-processing the Audio
If 48 FPS is the desired frame rate, we need exactly 48 audio snapshots per second, no more, no less. And, they need to be spaced as close to 0.0208 seconds apart as possible. In order to do this, I create an array of seconds, where each element is a pre-sized array of 48 snapshots. But how do I know when to save one of these snapshots?
The Web Audio API provides its own timing system, which is reportedly much better than the JavaScript clock. AudioContext.currentTime returns the time elapsed since the AudioContext was created. Unfortunately, a lot of stuff happens after I create the audio context, e.g., setting up buffers and analyzers, adding the audio processing callback, etc, before I can start playing the track. There is no way to tell the current time of the track itself. So, in my audio processing callback, on the first call, I have to figure out the offset. That allows me to keep abreast of the track time, and thus to know if it’s time to save the most recently taken snapshot into the next frame time bucket in the seconds array.
As if things weren’t hinky enough with the timing, there is the fact that the start of audio processing and the start of playback can’t actually be synchronized. The AudioBufferSourceNode begins calling its onaudioprocess function as soon as you set your callback on it. Audio playback begins (on my machine) about 11 milliseconds after I call AudioBufferSourceNode.start(), so I start the audio playback then set the callback. Either way, the usual result is several silent audio frames at the beginning of my snapshots. They’re easy enough to discard later.
Another issue is that invocations of the onaudioprocess callback are not guaranteed. If your machine gets busy, it might miss several frames in between calls. If I were just pushing snapshots onto an array, it’d be difficult to detect and fix that. Therefore, in my seconds array, each time the AudioContext’s properly offset currentTime value (which is returned in seconds rather than milliseconds like the JavaScript clock) passes into a new second, I add another snapshot array, presized to 48 (or whatever the frame rate is) elements. And when I save a snapshot, I put it into what I believe to be the correct bucket, based on the time.
At the end of playback, we have an array of arrays, loaded with snapshots. Some of the snapshot elements may be missing, owing to the occasional hiccup in the callback time, and there’s probably a few frames of silent snapshots at the beginning because of the startup syncing problem. But the snapshots we have, relative to each other are in all the right place.
To create a stream of snapshots that the rendering process can use, I do a pass over the extracted data, dropping any initial silent frames, and when I hit an empty element, I fill it with a copy of the previous snapshot. As a future optimization, I’ll fill that hole with the closest snapshot rather than the previous one, such that if the gap is four frames long, the first two holes are filled with the last good snapshot and the last two are filled with the next one. Or perhaps even interpolate the values between the next and previous one. Fortunately, these hiccups don’t happen often or for long, and there’s a way to hedge your bets: choosing the right buffer size for your desired frame rate.
How Audio Buffer Size Affects Frame Rate
When you call AudioContext.createScriptProcessor() the first parameter is buffer size, and it affects how often your audio processing callback will be called. The value must be a power of 2, beginning with 512 (512, 1024, 2048, 4096…). The ScriptProcessor waits until that buffer is full before calling you, so as you might expect, the relationship between buffer size and call frequency is inversely proportional; the higher the buffer size, the less frequently your callback will be invoked. Nothing is guaranteed, though, since your system could occasionally get too busy to make the call.
You want the callbacks to happen at least as frequently as the desired frame rate, preferably much more often, to reduce the impact of any hiccups. So, I did some quick testing to determine the optimum buffer size, by taking advantage of FireFox’s way of reporting duplicate console log lines. If the same line is reported more than once, it shows the line with a red pill indicating the number of duplicate lines. I added a call to console.log() at the end of my audio processing function, reporting the second that I was processing audio for.
The results:
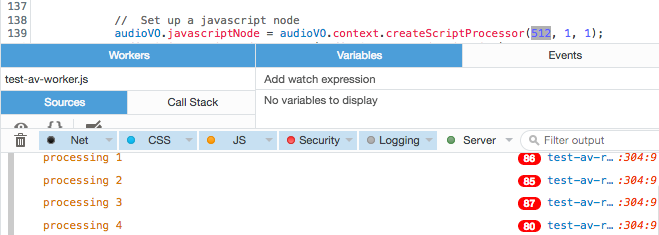
With buffer size of 512, calls per second is about 80
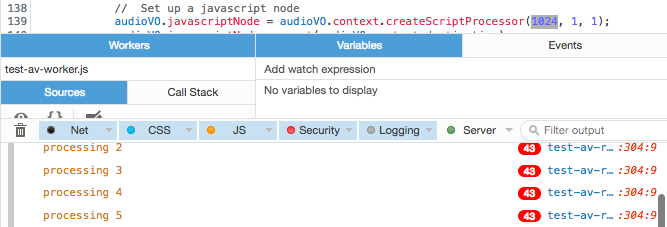
With buffer size of 1024, calls per second is about 40

With buffer size of 2048, calls per second is about 20
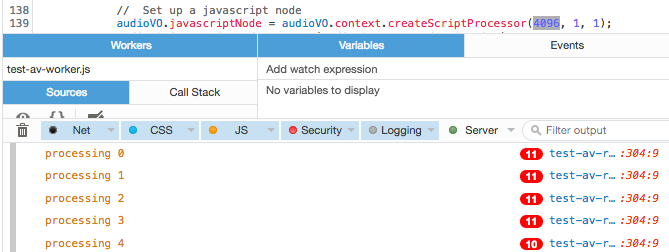
With buffer size of 4096, calls per second is about 10
Consequently, if we want a frame rate of 48 FPS, we need to set the buffer to the smallest size: 512, yielding approximately 80 callbacks per second. Otherwise, we might not get enough snapshots on a slower or more overworked machine, and hiccups could have a more deleterious effect on the resulting data stream.
Our audio processing callback stores data on a value object called audioVO:
// Audio value object.
// Values extracted on each audio sample that affect rendered scene.
var audioVO = {
    context: null,
    sourceNode: null,
    javascriptNode: null,
    splitter: null,
    analyser: null,
    analyser2: null,
    analyserFreq: null,
    audio_freqArray: [],
    audio_lAverage: 0,
    audio_rAverage: 0,
    audioVolume: 0,
    audioBass: 0,
    audioHigh: 0,
    audioMid: 0
};
Here’s what it does each time the ScriptProcessorNode calls us back:
// Audio processing callback
//
// Collects an array of arrays: seconds and snapshots.
// We don't know duration of the audio, so we track
// each second, collecting an array of snapshots,
// each taken at its calculated offset within the second.
// Since there could be hiccups in timing, and we have
// no assurance that we'll be called exactly on time for
// each snapshot, we take a snapshot (in audioVO) each
// time we're called, and when we reach (or pass) the
// next target frame time, we use last one taken.
function process() {

    // On first call, get offset since context was created
    if (!offset) offset = audioVO.context.currentTime;

    // Get the adjusted time in seconds since we started playback
    currentTime = audioVO.context.currentTime - offset;

    // Get the array of frames for the current second
    currentSecond = Math.floor(currentTime);
    if (seconds.length > currentSecond) {
        currentFrameSet = seconds[currentSecond];
    } else {
        currentFrameSet = new Array(FPS);
        seconds.push(currentFrameSet);
        currentFrame = 0;
    }

    // Calculate the target time for this frame
    // Frame frequency of 0.03333 yields 30 fps
    // Frame frequency of 0.02083 yields 48 fps
    // Frame frequency of 0.01666 yields 60 fps
    targetTime = currentSecond + (currentFrame * frameFreq);

    // Have we passed the target time?
    // If so, store the last snapshot for the target.
    if (currentTime > targetTime) {
        displayMessage('Processing audio for second: ' + snapshot.second + ' / frame: ' + snapshot.frame );
        currentFrameSet[currentFrame] = snapshot;
        currentFrame++;
    }

    // Get average for the first channel
    var array = new Uint8Array(audioVO.analyser.frequencyBinCount);
    audioVO.analyser.getByteFrequencyData(array);
    var average = getAverageVolume(array);

    // Get average for the second channel
    var array2 = new Uint8Array(audioVO.analyser2.frequencyBinCount);
    audioVO.analyser2.getByteFrequencyData(array2);
    var average2 = getAverageVolume(array2);

    // Get frequency spectrum
    var freqArray = new Uint8Array(audioVO.analyserFreq.frequencyBinCount);
    audioVO.analyserFreq.getByteFrequencyData(freqArray);

    // Load the audioVO with the actionable values
    audioVO.audio_lAverage = average;
    audioVO.audio_rAverage = average2;
    audioVO.audioVolume = (average + average2) / 2 / 100;
    audioVO.audio_freqArray = freqArray;
    audioVO.audioBass = getAverageVolume(freqArray.slice(0, 7)) / 200;
    audioVO.audioMid = getAverageVolume(freqArray.slice(8, 65)) / 125;
    audioVO.audioHigh = getAverageVolume(freqArray.slice(65, 128)) / 75;

    // Snapshot just the actionable values and timing info
    snapshot = {
        second: currentSecond,
        frame: currentFrame,
        currentTime: currentTime,
        targetTime: targetTime,
        audio_lAverage: audioVO.audio_lAverage,
        audio_rAverage: audioVO.audio_rAverage,
        audioVolume: audioVO.audioVolume,
        audioBass: audioVO.audioBass,
        audioHigh: audioVO.audioHigh,
        audioMid: audioVO.audioMid
    };

    // Uncomment to determine how often this method is called
    // console.log("processing "+currentSecond);

    // Inner private function to get average volume
    function getAverageVolume (array) {
        var values = 0;
        var average;
        var length = array.length;

        // get all the frequency amplitudes
        for (var i = 0; i < length; i++) {
            values += array[i];
        }

        average = values / length;
        return average;
    }
}

// The audio playback complete handler
function onPlaybackComplete() {
    displayMessage('Audio playback complete');
    audioVO.sourceNode.stop(0);
    audioVO.sourceNode.disconnect(audioVO.context.destination);
    audioVO.javascriptNode.disconnect(audioVO.context.destination);
    audioVO.javascriptNode.onaudioprocess = null;
    postProcessAudio();
}
Rendering the Frames
The rendering process is largely the same as that presented in the previous article, except for a few tweaks.
First, I display the canvas instead of rendering it offscreen. For some reason, when rendering offscreen, I would see chunks of black frames. I have no idea if this was an problem related to browser implementation or what. When you look into offscreen rendering on the web, you generally find advice telling you to use a WebGLRenderTarget, but unfortunately you can’t use canvas.toDataURL(‘image/png’) to grab an image that can just be pushed across the wire to the server. For the purposes of this demonstration, I didn’t want to add the level of complexity associated with using gl.readPixels to get the data and then have to transform it into a PNG. The easy answer was to just show the frames being rendered. In that last demo, we were concerned about trying to do things in realtime, and rendering offscreen was a way to shave cycles off the process. Now, unbound of that constraint, we can throw care to the wind and watch the frames be rendered.
Also, I dropped the simple rotating cube in the scene, opting for something a little more fun. The cube moves around in a counterclockwise motion, position and rotation being affected by the music. It leaves clones of itself along the way, which continually fall away from the camera, their scale pulsing to the overall volume. Rotation is tied to channel volume, and they are assigned random x, y, and z velocities (tied to the different spectral bands) at their birth. And finally, the camera rotates along the z axis, its rotation speed also governed by volume, so the kick causes everything to whirl around a little faster, and silence causes things to slow down.
Anyway, here is that render loop:
// The render loop
var done = false;
var frame = 0;
var clones = [];
var i;
function render() {

    if (!done) {

        // Tie cube location to audio low, mid, high and l/r averages
        // Also, rock it around the clock
        var radius = 2;
        var angle = frame.mod(360);
        var newX = (radius + audioVO.audioHigh) * Math.cos(angle / audioVO.audio_lAverage);
        var newY = (radius + audioVO.audioMid) * Math.sin(angle / audioVO.audio_rAverage);
        var newZ = (radius - audioVO.audioBass) / Math.tan(angle * audioVO.audioVolume);
        cube.position.set(newX, newY, newZ);

        // Tie rotation to averages
        cube.rotation.x += audioVO.audio_lAverage;
        cube.rotation.y += audioVO.audio_rAverage;

        // Tie cube scale to audio bass
        var scale = (frame).mod(audioVO.audioBass);
        var newScale = scale / audioVO.audioBass;
        cube.scale.set(newScale,newScale,newScale);

        // Throw the occasional clone
        if (Math.floor(Math.random() * 2)){
            var clone = new THREE.Mesh( geometry, material );
            clone.scale.set(newScale / 5, newScale / 5, newScale / 5);
            clone.position.set(newX, newY, newZ);
            clone.rotation.x -= audioVO.audio_rAverage;
            clone.rotation.y -= audioVO.audio_lAverage;
            clone.velocity = {
                x: (Math.random() * audioVO.audioBass)/2,
                y: (Math.random() * audioVO.audioMid)/2,
                z: (Math.random() * audioVO.audioHigh)/2
            };
            scene.add(clone);
            clones.push(clone);
        }

        // Adjust the clones
        for (i=0; i<clones.length; i++){
            clone = clones[i];
            clone.position.z -= (clone.velocity.z - angle.mod(-newZ / i));
            clone.position.y += (clone.velocity.y + angle.mod(-newY / i));
            clone.position.x -= (clone.velocity.x - angle.mod(newX / i));
            newScale = audioVO.audioVolume.mod(i) / 2;
            clone.scale.set(newScale, newScale, newScale);
        }

        // Kick the camera rotation based on volume
        camera.rotation.z -= audioVO.audioVolume/2;

        // Render and increment frame
        requestAnimationFrame(render);
        renderer.render(scene, camera);
        frame++;

    } else {
        // Clear canvas after final frame is rendered
        renderer.clear();
    }
}
Actors and Communication Protocol
The previous demo was about one thing: figuring out if we could render and push the frames to the server in realtime. There was minimal feedback on the process and not much in the way of inter-component communication protocol. All that changes this with go around.
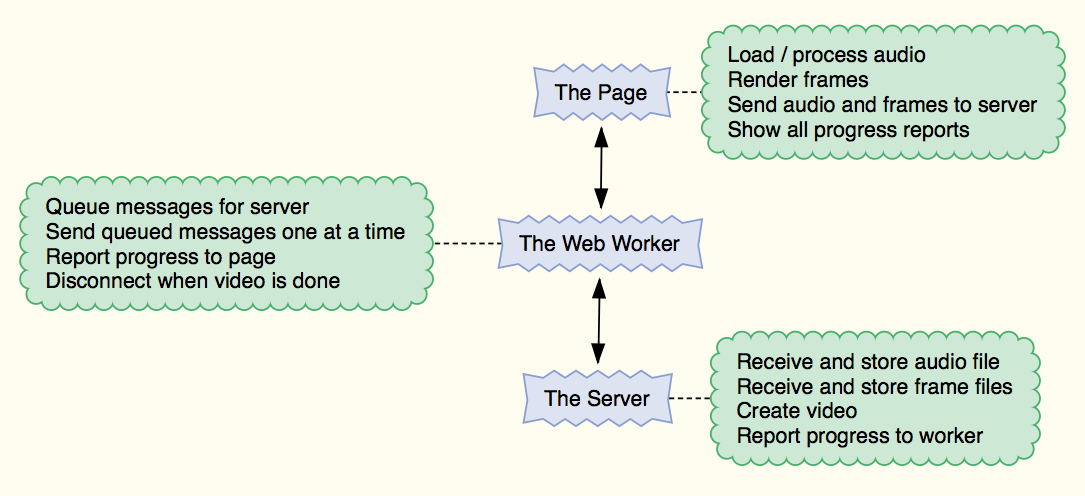
There are three moving parts to the system:
- A script in the page
- A Web Worker
- A Node.js server script
Each has its own responsibilities and we need to know that they’re properly communicating with to each other and acting on those passed messages as expected. A running log reporting activity from all three parts of the system gets difficult to follow, so I’ve added status report locations for all three actors at the top of the web page.
The Server

Server is Listening
This script must be running before loading the browser page. Since each client (socket connection) has its own unique id, we can use that to separate received and generated data for simultaneous clients. This script stores all incoming and generated data in /var/tmp/test-av-server/<client-id>/, creating the any missing bits of the folder path on the fly, as need be.
Using Socket.io, the server script begins listening on a configurable port, and when it receives a connection, sets listeners for the following messages:
- frame – The data property of this message is a binary chunk to be saved as a .png image. It also has an ordinal property that is the frame number to save. The server responds by saving the data to a file in the client’s folder, using the format: frame_000000.png, replacing the numeric part with the zero-padded frame number.
- audio – Also has a data property, a binary chunk to be saved as an audio file using the name specified by the message’s filename property.
- done – This message is simply a notification that the client has finished sending frames. The server responds by running an FFMpeg command to build the video. As in our first encounter with FFMpeg, I watermark the video. For the demo on this page, I’ve used a single transparent PNG with my recording project name and the track name, placed at the bottom of the video.
- disconnect – Sent automatically when either the browser is closed, the page is refreshed, or the client closes the socket. When this message is received, the server removes the event listeners from the connection object. In the real application, it will additionally clean up after any prematurely aborted conversation by removing the associated temporary folder entirely. For successful exchanges, it will remove just the frames and audio, leaving the resultant video for later review and upload to video sites like YouTube.
Once all the data has been received, the video creation process is kicked off, and the server script sends the following messages:
- video-progress – This message has a data property, which is a formatted string reporting the length of the video rendered so far. FFMpeg sends these updates quite frequently, so no duplicates are sent to the client.
- video-error – The data property contains a verbatim copy of any error reported by FFMpeg while attempting to create the video.
- video-done – This is the last message that will be sent to the client, and its data property contains the full path and filename of the completed video.
Each message also has an id property which is the client’s unique id. The handlers for the frame and audio messages also invoke a callback function passed in by the client, to acknowledge receipt of the message.
The Web Worker
Running in a separate thread from the script in the page, the primary responsibility of the worker script is to handle communications between the page and the server. Since most of the messages coming from the page contain big chunks of data, the worker queues all outgoing messages, only sending the next queue item after receiving acknowledgement from the server that the previous one arrived safely. Word of those transmissions and acknowledgements is passed back to the page for status reporting.
When the web worker receives a video-done or video-error message from the server, it forwards them to the page for reporting, then closes both the socket and itself.
The Page
This script has quite a laundry list of responsibilities:
- Create the Web Worker
- Allow the user to select an audio file
- Load the audio file
- Create a pipeline of Web Audio API nodes and filters to play and analyze the audio content
- Send the audio file to the server (via a message to the worker)
- Take per-frame snapshots of the bass, midrange, and high bands, as well as the left, right, and overall volume
- Fill in any gaps in the snapshots
- Discard any initial silent snapshots
- Set up a 3D scene, camera, renderer, etc.
- Render a frame for every snapshot in the list
- Send each frame to the server (again, through the worker)
- Report all activity to the user in separate status lines for the page, worker, and server
The Conversation
Below are the key turning points of the conversation going on between these actors as they go about their business:
Step 1 – Prompt for Audio File

User chooses a file.
Step 2 – Process Audio

Page loads the audio file, sends it to the server, and starts processing it.
Step 3 – Render Frames

Page renders the frames, using the pre-processed audio, and sending each one to the server.
Step 4 – Create Video

Server creates the video.
Step 5 – Mission Accomplished

Server reports location of final video file. Page calculates and displays total build time.
Conclusion
We now have a viable render and build process that yields a completed 48 FPS, 1080p HD video, ready for upload to YouTube. The process is reasonably robust for a demo, and shouldn’t need a huge amount of tweaking to apply the lessons learned here to our real app.
Included in the demo is a realtime preview page (which allows quick testing of audio processing and rendering), a recording page (which takes somewhere in the neighborhood of 13 seconds per frame to create the final video once the audio is loaded), the worker (a great skeleton for a message passing protocol handler), and the server code including a package,json that declares the dependencies you’ll need to spin it up in Node. Since there’s a lot of code involved, you can pick it up from this GitHub Gist.
I hope you’ve been enjoying these reports, and I’ll report in again after our next major milestone.
Author’s Note: This article is part of a series, wherein my partner and I are trying out the development of our a product ‘out in the open’.
This is diametrically opposed to my typical ‘skunk works’ approach, holing myself up for months on end in a pointless attempt to keep secret something that will eventually become public anyway. We’re not building anything earth-shattering, paradigm-shifting, or empire-building. Just something cool that serves a niche we know and are interested in helping. It’s a 3D music visualizer built in HTML5 / WebGL using Three.js., PureMVC, React, and Node.js. When we’re done, you’ll be able to create a cool video for your audio track and upload it to YouTube.
The benefit of blogging about it as we go is that we get a chance to pass on some of our thought processes as we navigate the hurdles and potholes strewn along our path. Getting those thoughts down while they’re still fresh in mind might guide someone else following a similar path. If we fail owing to these decisions, maybe it’ll help you avoid your own smoking crater. Either way, later on, we’ll be busy chasing different squirrels in some other park.
The previous article in this series is: WebGL Performance Challenge: Render Thirty Frames per Second and Send them to the Server
This article has been reblogged at the following sites:
DZone: http://bit.ly/break-free-of-the-realtime-jail