
 Last week, I reported on an important milestone in our music visualizer project: Successful creation (from static files) of an HD video (with audio) using Node.js and FFMpeg. Our ultimate goal: To generate thirty client-rendered WebGL frames per second, push them across a socket to a Node.js microservice, create a video, and upload it to YouTube.
Sounds crazy? You bet. But it’s a mad, mad world, and it just might happen.
When I last left off, in addition to our browser client (built with Three.js, React, and PureMVC), we had a server-side proof of concept running on Node.js, FFMpeg, and PureMVC. This POC simply started up, created an FFMpeg command, configured it with the locations of our images and audio, then spit out a video that could be uploaded manually to YouTube with no issues.
Time to Add Sockets into the Mix
Let’s just get this out of the way right now: Websockets are great, but there are soooo many libraries competing for your attention. The research becomes a real time-sink. While we now have Websocket support in all major browsers (except Opera Mini), unless you want to deal with low-level details such as handling reconnects, you probably just want to pick a library. And, please — do everyone a favor: Don’t get disgusted, decide to write your own, and throw it into the mix. If you feel those urges, I implore you to fork someone else’s, make it better, and send a pull request.
My research led me to choose Socket.io, even though:
- Its documentation is horrible.
- Its two on-site demos don’t work.
- Its Slack channel link is broken.
- It has features that lie outside the core business of socket management (like ‘rooms’), which add to the ongoing list of bugs and feature requests, making it difficult to determine if all the functionality you need is actually working. Nail down your scope, dudes, please.
Despite all this, the above linked research and sheer volume of downloads led me to believe it might be the right choice for our project. At least to start out. Its implementation details are similar enough to all the other options that even if it did need to be replaced later, the refactoring wouldn’t be so bad.
Step 1: Add Socket.io to the Node Project
npm install socket.io --save
Step 2: Create a Socket Server
// Create the socket server
const PORT = 3000;
var socket = require('socket.io')(PORT);
Step 3: Connect From the Command Line
Once the above code was folded it into my POC, I had a running socket server and wanted to chat with it. Telnet connected, but didn’t get me anywhere because although I could connect, the handshake protocol is header-based. Anything I tried to send immediately closed the socket.
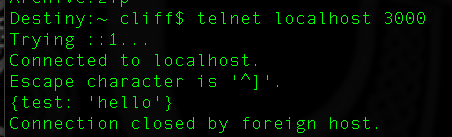
Telnet no bueno.
So I found and installed wscat, which should have allowed me to connect and send a message with:
wscat -c ws://localhost:3000 -m Allo?
But no dice.

wscat, nada.
I timeboxed my attempt to connect through the command line, leaving off the message, trying different options, researching the protocol, etc., eventually giving up and moving on to the more complicated but necessary step of creating a test HTML client.
However, I circled back around to the issue while writing this article, because I couldn’t accept that there was no easy way to connect to a Socket.io server via the command line. It turns out that the reason wscat didn’t work, is that Socket.io is not speaking the Websocket protocol. This would be a nice entry for the Socket.io docs or FAQ page, but alas, it isn’t mentioned anywhere on the site as far as I could determine.
The answer is iocat, which talks to either Websockets or Socket.io. Install it like this:
npm install iocat -g
$ iocat --socketio ws://localhost:3000
> Allo?
That’s fine, but of course I’d already moved on to creating an HTML test page. I just wanted to make you aware of this command line client.
Also worth mentioning here is Monitor.io, which provides a nice telnet interface for monitoring and debugging Socket.io applications. This will come in handy while testing multiple, simultaneous connections particularly, with the massive amount of data we plan to push across each.
Step 4: Send a Message From the Browser
There is a handy-dandy resource at websocket.org that lets you connect to a socket server using the browser’s built in Websocket support (with or without the secure websocket layer), test message echo, and disconnect. Also on that page is an HTML snippet you can use to build your own test.
Starting with that code as a base, I refactored to use Socket.io instead of Websocket:
<!-- test-io-client.html -->
<script src="https://cdn.socket.io/socket.io-1.4.5.js"></script>
<script>

    function init()
    {
        output = document.getElementById("output");
        testSocket();
    }

    function testSocket()
    {
        var socket = io.connect('http://localhost:3000/');
        socket.on('test', onMessage );
        socket.on('connect', onConnect );
        socket.on('disconnect', onDisconnect );
        socket.on('connect_error', onError );
        socket.on('reconnect_error', onError );

        function onConnect(evt)
        {
            writeToScreen("CONNECTED");
            doSend("Allo?");
        }

        function onDisconnect(evt)
        {
            writeToScreen("DISCONNECTED");
        }

        function onMessage(data)
        {
            writeToScreen('<span style="color: blue;">RESPONSE: ' + data+'</span>');
            socket.close();
        }

        function onError(message)
        {
            writeToScreen('<span style="color: red;">ERROR:</span> ' + message);
        }

        function doSend(message)
        {
            writeToScreen("SENT: " + message);
            socket.emit('test', message);
        }

        function writeToScreen(message)
        {
            var pre = document.createElement("p");
            pre.style.wordWrap = "break-word";
            pre.innerHTML = message;
            output.appendChild(pre);
        }
    }

    window.addEventListener("load", init, false);
</script>

<h2>Socket.io Test</h2>

<div id="output"></div>
The above client-side code will connect to the socket server and emit a ‘test’ event with a message. It will also listen for a ‘test’ event from the server, display its contents, then disconnect. And it shows connect and disconnect messages as well as several possible errors.
Step 5: Handle Inbound Connections on Server
In the server project, I added a quick standalone counterpart to the test client, which will listen for ‘test’ events, log them to the console, and respond to the client by emitting its own ‘test’ event with a welcome message that includes the client’s connection id.
// test-io-server.js

// Create the socket server
const PORT = 3000;
var socket = require('socket.io')(PORT);
socket.on('connection', function(client) {

    // Listen for test and disconnect events
    client.on('test', onTest);
    client.on('disconnect', onDisconnect);

    // Handle a test event from the client
    function onTest(data) {
        console.log('Received: "' + data + '" from client: ' + client.id);
        client.emit('test', "Cheers, " + client.id);
    }

    // Handle a disconnection from the client
    function onDisconnect() {
        console.log('Received Disconnect from client: ' + client.id);
        client.removeListener('test', onTest);
        client.removeListener('disconnect', onDisconnect);
    }
});
Now, from Webstorm (or some inferior IDE):
- Run the test-io-server.js file to launch it in Node, and begin listening on port 3000.
- Run the test-io-client.html file to launch a server and serve the client to the browser.
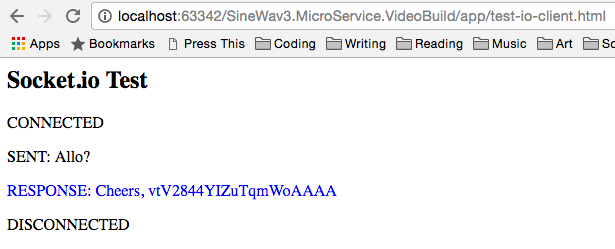
Client output of the Socket.io test

Server console output
That was easy enough. You can grab the the code from this Gist on Github.
Next Steps
Now I need to:
- Push images across the socket (possible as of Socket.io version 1.0)
- Store the images in a temporary folder,
- Kick off a video build (which I already figured out a couple of articles back),
- Clean up the sources.
At this point, it’s reasonable to build these aspects into the microservice as opposed to creating another throwaway test rig. I’ll cover that in the next article, and go into the architecture a bit more.
Author’s Note: This article is part of a series, wherein my partner and I are trying out the development of our a product ‘out in the open’.
This is diametrically opposed to my typical ‘skunk works’ approach, holing myself up for months on end in a pointless attempt to keep secret something that will eventually become public anyway. We’re not building anything earth-shattering, paradigm-shifting, or empire-building. Just something cool that serves a niche we know and are interested in helping. It’s a 3D music visualizer built in HTML5 / WebGL using Three.js., PureMVC, React, and Node.js. When we’re done, you’ll be able to create a cool video for your audio track and upload it to YouTube.
The benefit of blogging about it as we go is that we get a chance to pass on some of our thought processes as we navigate the hurdles and potholes strewn along our path. Getting those thoughts down while they’re still fresh in mind might guide someone else following a similar path. If we fail owing to these decisions, maybe it’ll help you avoid your own smoking crater. Either way, later on, we’ll be busy chasing different squirrels in some other park.
The previous article in this series is: Creating Video on the Server in Node.js
The next article is: WebGL Performance Challenge: Render Thirty Frames per Second and Send them to the Server
This article has been reblogged at the following sites:
Thank you for your article. I had been searched a lot. so far, your code is the only one which works!!!